2024.12.25
I. Reagent Preparation
Prepare bacteria
- Inoculate overnight cultures
- From glycerol stocks, plate, or preexisting liquid culture inoculate 5mL starter culture(s) in complete DRM with antibiotics.
- Grow culture overnight in preparation for your experiment.
Prepare DRM Growth Media
- Make DRM-A
CRITICAL: Make sure to start prepping the DRM-A the night before a run, as the DRM-A needs to cool completely before adding DRM-C. Ideally, let the DRM-A cool at room temp then store in the fridge until use. DO NOT ADD DRM-C WITH ANTIBIOTICS UNTIL TEMP REACHES < 55C. Can cool down in a few hours by placing the carboy in the sink with an autoclave tray full of water
- For each 4 L carboy of DRM-A add:
| Milli-Q water | 4L | |
| DRM-A | 79.5g | |
| Tween 20 | 1150uL | Use either a 2mL serological pipette, or cut the tip off of a 1000uL micropipette tip to create a wide-bore. |
- Ensure the carboy lid has two luer lock caps and a small filter disc attached (filter disc from previous experiment okay).
- Confirm rubber O-ring seal is in place inside the carboy cap.
- Autoclaving DRM-A
- Leave the lid on the carboy with only half a twist. Use autoclave tape to secure the loose lid on the carboy. Wiggle to make sure that lid is on enough that it cannot pop off.
- Autoclave for 1hr liquid cycle (autoclave near Emma's office)
- After autoclaving, tighten the lid and inspect the filter unit is intact.
- Adjust volume to 4L: After autoclaving, bring volume up to 4L with sterile Milli-Q water.
- Make a label for DRM-A to note when and DRM-C has been added.
- Make DRM-C
- Prepare 500 mL of DRM-C (Ryan usually makes it in a clean flask with a magnetic bar with ~37C heat to dissolve quickly)
- Sterile filter in 500 mL 0.2uM filter bottle:
| Harvard custom Media C | 115 g | |
| Trace Elements | 120 uL | Brown precipitate in stocks are expected, mix before pipetting |
| 1M CaCl2 | 10 uL | |
| Milli-Q Water | 500 mL | |
| Antibiotics (optional) | 40-80X (FINAL) | *Antibiotics can be added here or using powder directly into carboy |
- Prepare complete DRM for robot experiments
- Add 100 mL DRM-C to 4L DRM-A after DRM-A has cooled (overnight ideal, possible after >3 hours at room temp or in waterfilled autoclave bin with carboy gyration)
- If necessary, add antibiotics to DRM-C before transfer. It is possible to add powder directly to the media carboy instead of DRM-C, but ensure it is mixed by gyration. S2060 cells, our general PACE strain, is Streptomycin resistant. For S2060 cells, add 0.2g Streptomycin powder directly to 4L of autoclaved DRM-A for 1X concentration.
Prepare inducer plates
- According to your particular experiments you will need to prepare an inducer plate which includes any supplements. This includes antibiotics, inducer molecules, or non-canonical amino acids. As well, for multi-day or induction style experiments you may start with only supplying antibiotics, and then choose to switch to an inducer plate containing antibiotics and IPTG for example.
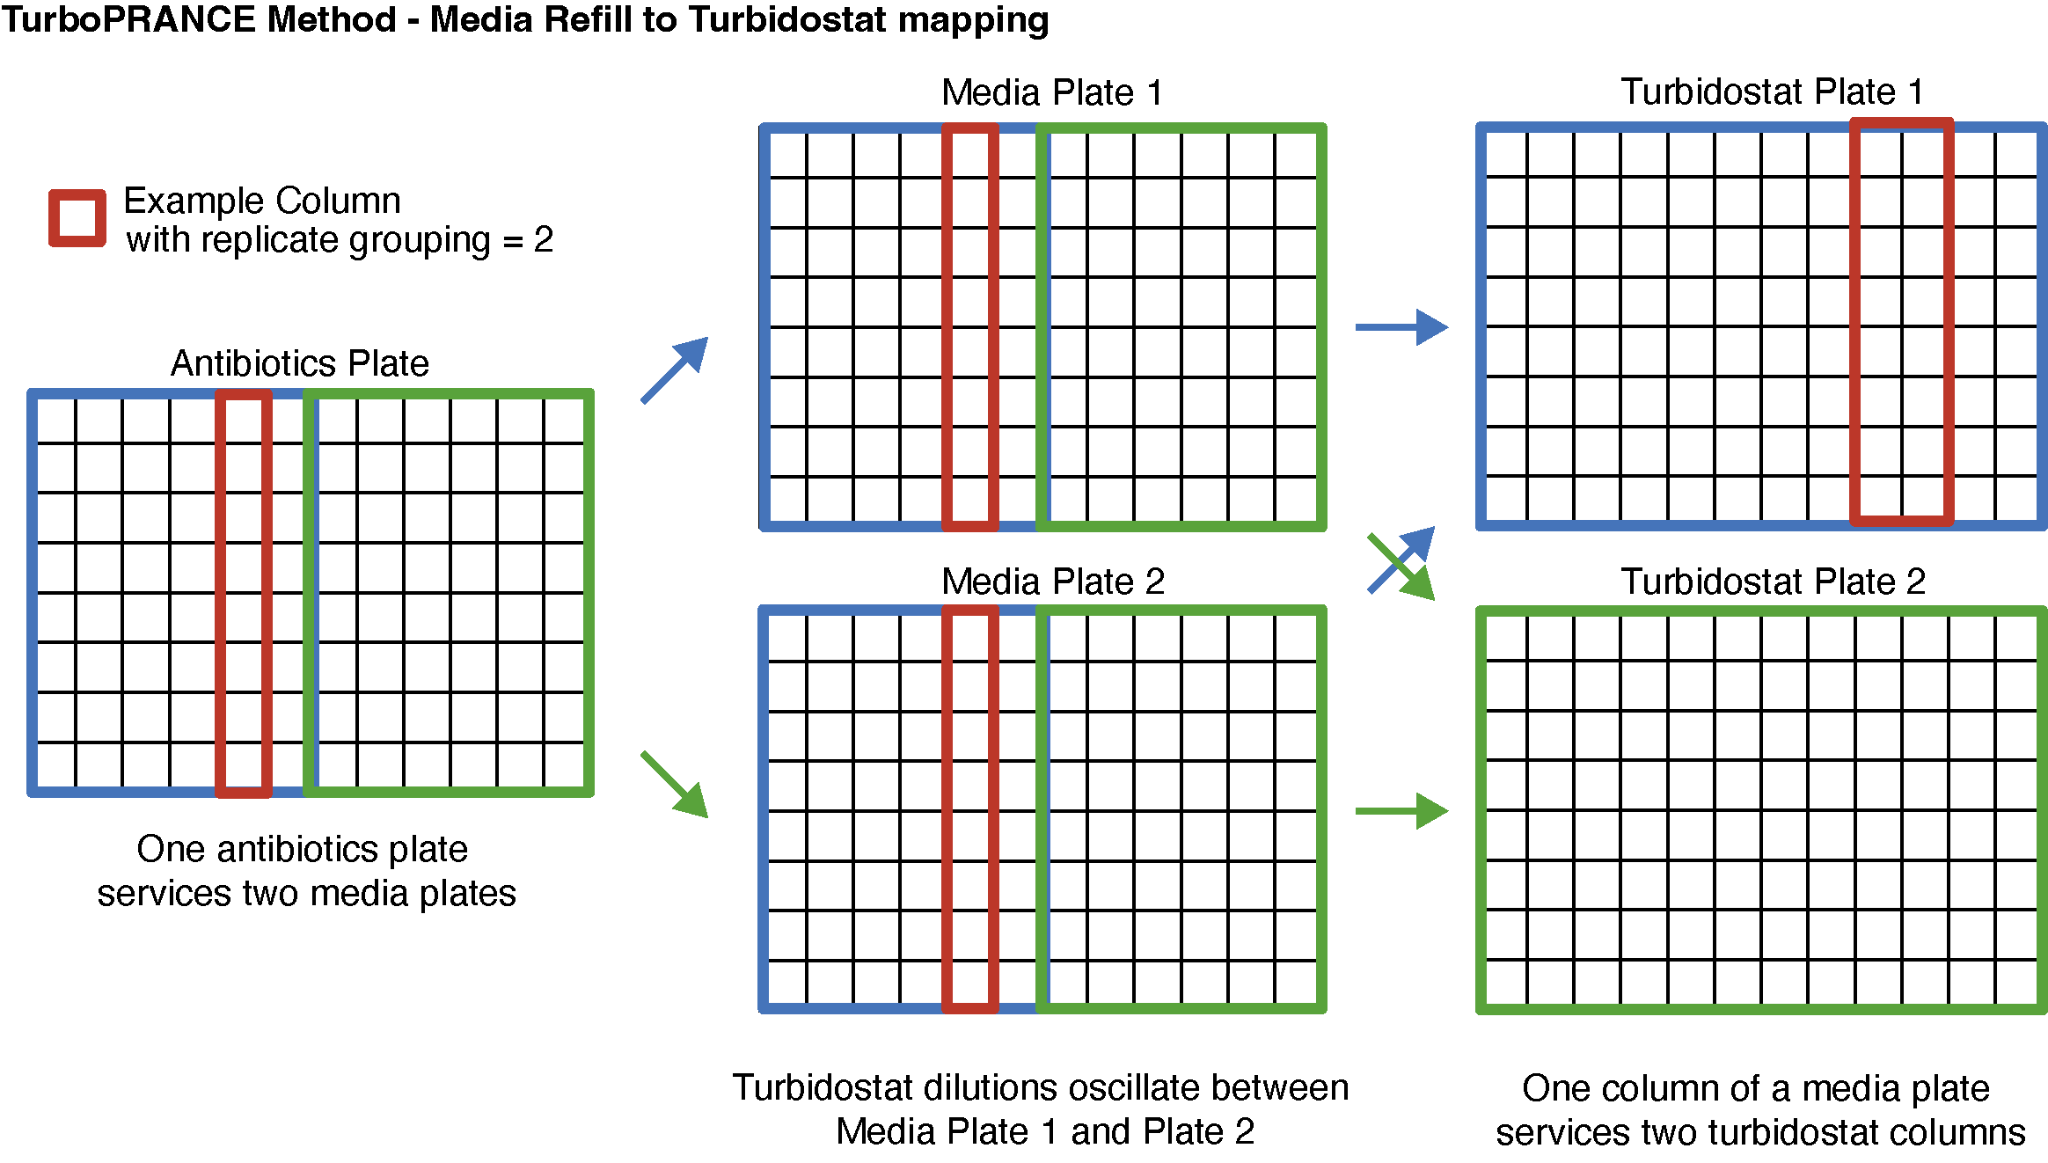
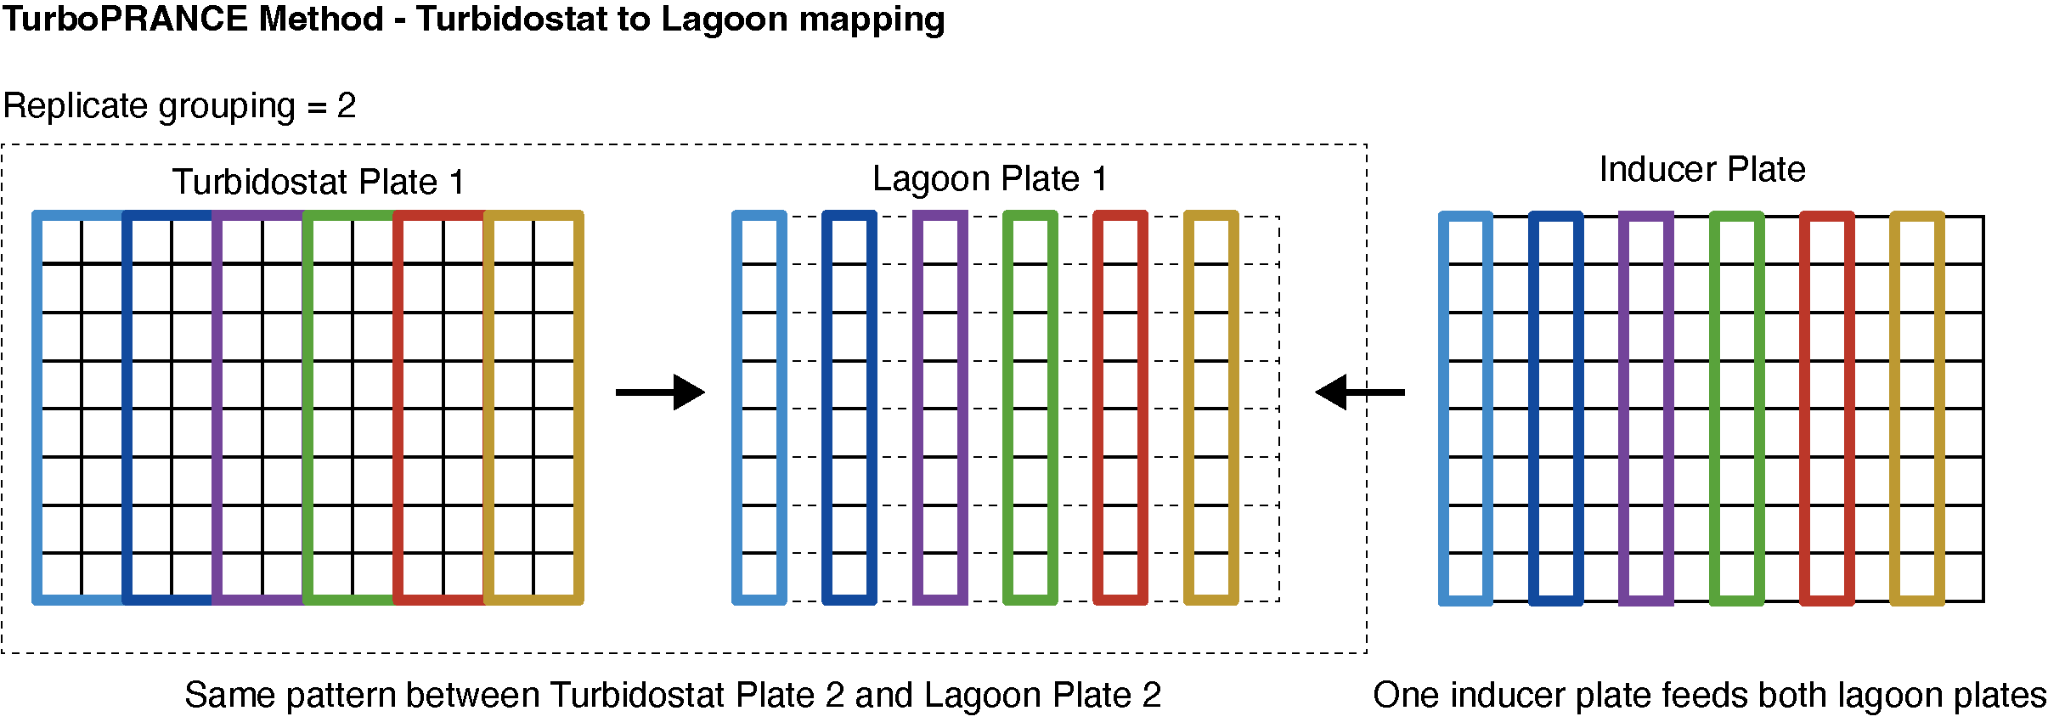
- The main turbidostat and turboPRANCE protocols currently uses one inducer plate to generate two media plates. For turbidostat, antibiotics and inducer molecules should match the well coordinates 1:1 with the turbidostat plate wells. This is not the same for turboPRANCE which uses replicate groupings below and needs a more complicated inducer plate layout, details provided in turboPRANCE section.
- The current turbidostat protocol adds 42.5ul of inducer volume to 850mL of DRM growth media. Thus, any supplements require a 10x - 20X concentration in the inducer plate. For antibiotics, currently I use 10x (for final 0.5X concentration)
- To prepare inducer plates first create a volume of water with the necessary antibiotics at at 10x-20x concentration for final 0.5x or 1x respectively. For a 96 deep well plate with 1.8mL of inducer volume each I first add 200mL autoclaved water to an autoclaved 500mL flask. Then I add 2mL of 1000x antibiotic concentration. Generally, I will not use lab aliquots for this purpose, I will make my own 50mL conicals of 1000x antibiotics to use for bulk addition.
- For inducer plates using Arabinose and or IPTG create dilutions using the reference tables at the end of the protocol here. With these dilutions, use an electronic multichannel to rapidly add 12ul of each inducer to empty deep well plates. For two inducers, avoid crossover/contamination of inducer levels when pipetting the second inducer e.g. pipette in a fashion where pipette tips only ever are exposed to increasing levels.
- Once inducers have been added, add your antibiotic:water mix to a reagent reservoir and use the P1000 multichannel to pipette 1mL into each deep well. For inducer containing deep wells, add in a fashion where the inducer concentration is increasing to avoid inducer crossover/contamination.
- Ethanol spray a compatible 96-well lid that is either fresh/sterile or has been ran through the washing machine, let it dry in a sterile fashion and place on deepwell before transporting to the robot room.
Autoclaving Hamilton Pipette Tips
To save money and prevent waste we autoclave used Hamilton Tips. The following is a short protocol
II. Experimental Initiation
Prepare Robot
- Tidy robot area
- Reserve robot using the lab’s Equipment Scheduler
- Clear away all test deck resources
- Tidy area around the robot, and the bench across from the robot so that experiments can proceed without disruption.
- Remove anything from robot area that is unnecessary for turbidostat
- Check the number of available black plates (and confirm that plate brand is compatible with layfile). Order extra plates, if running low.
- CRITICAL: Always ensure that a sufficient number of plates are in stock before starting an experiment, especially if another lab member is planning to run an experiment after you. If plates are running low, adjust your experiment accordingly (lower the sampling frequency) so that enough plates are left for another lab member to run an experiment. Never be the person to use the last plate.
- Sterilize Robot
- Remove all items on robot deck and clean surface & carriers
- Wipe down with 10% bleach
- Wipe down with water
- Spray with ethanol (be careful not to breathe in ethanol vapor)
- Dry with kim-wipe
- Add fresh sterile or autoclaved pipette tips to racks and autoclaved racks for the “dirty tip racks”, Taping down tip racks is highly recommended and required if tips or racks were autoclaved.
- Set-up and Check Robot Deck
- If necessary, turn on the HEPA filters fans (switch on front, Fan speed 4) and the heaters above (switches on the back).
- Set up the deck according to the deck layout reference photo on the second page.
- Ensure that any components that are not moving ARE TAPED TO THE ROBOT. This includes media reservoirs & plate holding stations.
- Flush media lines
- Disconnect media line inside refrigerator from an existing carboy if necessary
- Flush 2x with 5% bleach
- Insert the media line all the way to the bottom of a graduated cylinder filled with 1L of 5% bleach. You may have to put something under the cylinder for the line to reach the bottom.
- From the command line in the User directory (e.g. Hamilton), run “py pump_controls.py.”
- Select and run 2X the “Flush media 30 sec” command. You may need to close the window and re-run the previous command between flushes.
- Flush 2x using a similar approach but now using 1L of autoclaved water.
- Spray the end of the tube with ethanol, and cap with sterile luer lock until connecting to sterile media.
- Just before run: Connect media line to media carboy (DRM-A/C)
- Drain all media/water reservoirs if needed
- If the previous run was not stopped at the appropriate time you may need to drain all reservoirs before starting. To open the pump controls program: open a terminal and run “py pump_controls.py” which will open a window with a list of pump options. Select “Empty All”. The program takes >10 minutes to run but empties all reservoirs which is a compatible starting point to initiate an experiment using <- - new>. You may need to run the program twice.
- Refill Bleach
- Calculate how many liters of volume is necessary to fill up the carboy to 20L. Multiply by 0.05 to obtain the volume in mLs of bleach necessary to obtain 5% bleach.
- Turn the dH2O->bleach valve by the sink parallel with the tubing to begin filling the carboy.
- Measure out the necessary amount of bleach using a graduated cylinder and add directly to the bleach carboy by unscrewing the cap. CRITICAL Avoid moving the installed sensors and tubing attached to the cap. By adding bleach first or while water is filling the carboy mixing will occur due to water flow.
- Screw cap back on and wait for water to fill up to 20L 10L of water usually takes about 10 minutes. Close the valve from the sink by turning it perpendicular to the tubing. There is a float switch that will automatically shut off water once it gets to the set height, but make sure you turn the valve off before starting an experiment or else new water will flow in and dilute out the bleach indefinitely.
- Replace Media Carboy
- If the media carboy needs to be replaced, ensure the robot is not currently formulating media (is the antibiotics plate lid not currently on antibiotics plate?), and then simply disconnect and reconnect the media line to the new carboy. If you have a partially full carboy of media it is possible to fill the current carboy up using the remaining media from the previous carboy. Note: There is some risk involved in combining media from two carboys, the carboys can be heavier and hard to pour in a sterile fashion. And or, the previous media may be past its prime.
- Initiate Robot Method
- Start with all preparation steps completed above
- Close all existing open windows for Run Control/Venus and the Plate reader.
- Via the command line on the robot computer, navigate to the folder named after your method . For example, <turbidostat_20241219> within the ../Robot_Code folder.
- For a new experiment, while in this directory, run <py robot_method.py --new>
- Follow the prompts on the screen: Enter your name, a unique name for the experiment, a description for the experiment, the number of bacteria, media, grouped columns, and verify the correct controller manifest will be used.
- Initiate Method Analysis
- After you start a robot method run, the folder for your experiment will be automatically created under your name in the Experimental Data Repository and should be available via DropBox. CRITICAL: Create and copy your experimental manifests over to the enclosed folder labeled “Turbidostat Analysis”.
- To Run Method Analysis on your local Mac
- Using your terminal navigate to the folder location and type the following command <chmod +x *Analysis*>. This will make the analysis script executable from your computer, which may not grant scripts permission to execute otherwise.
- Then run the command <./RunAnalysis_Mac.command>.
- Follow the prompts on screen. 1) New experiment will initiate a new analysis, 2) will restart an existing analysis, 3) Is used to update an ongoing experiment with experimental details, for example when you induce or refill media.
- To Run Method Analysis on your local PC:
- Double click the .bat file located in the directory “Turbidostat Analysis” in your experiment’s data repository folder called “RunAnalysis_PC”
III. Modifying/Continuing an Experiment
- Refill Bleach Carboy if necessary (instructions above)
- Replace Media Carboy if necessary (instructions above)
- Changing Inducers or adding small molecules
- Make new 20X antibiotic + inducer plates with the desired changes
- Add 50ul of 20X inducer to each well of empty deep well plates
- Add 1mL complete DRM media directly to these deep well plates to complete media formulation.
- At the end of a plate dilution (last column has been diluted) replace the media and inducer plates on deck with newly created plates. CRITICAL: Both plates must be replaced at the same time to ensure turbidostat wells reach full concentration as soon as possible. Otherwise induction would require media formulation and be diluted by existing media, taking quite a few hours to reach full inducer levels.
IV. Terminating a Complete Experiment
If you need to stop a method, you can force stop the method by using Ctrl + C on the command line window running the method. It won’t stop until the end of a function (for example, diluting an entire plate cannot be stopped because that action is one function. BEWARE: Although several safeguards exist it is possible that if you force quit the method there will be a runaway/non-stopping pump. If that’s the case the quickest solution is to disconnect and reconnect the power to the pump array.
Method: Kinetics Growth Assay
Written by Ryan Boileau, at least currently :)
Last updated 12.23.2024 RB
Quick Reference Checklist
Before you start:
- Overnight bacteria culture
- Ethanol sprayed and sterilized robot deck
- Bacteria plates are 150ul of a 1:250 dilution bacteria culture (6-12hr experiment)
- Breath easy films are covering plates without wrinkles in the film
- Create accurate and detailed experimental manifest
When you start:
- Tip and plate racks on robot are fully pushed in
- Ensure tight connection between media line and media carboy
- Navigate to the folder 20240616_kineticsmonitoring and run >py kinetics_monitoring2_readeropt.py <username> –new
- Press play on Hamilton Run Control
Before you leave for the day:
- Ensure robot is still active
Deck Layout Reference
(for both starting and resetting for error_recovery)
Kinetics Growth Protocol
Summary
This method is a very simple method to perform relative to our other robot methods and has several differences that make preparing the experiment much easier. This method takes growth plates that are placed on deck and periodically shuttles them into the plate reader to take a reading before putting them back and measuring the next plate. There are no dilutions happening. The Kinetics Growth Assay handles up to 10x96 well plates at a time containing as many conditions as you want. The plates are sealed using a breathable and optical grade film called “Breathe Easy Seals” which permits gas exchange and dramatically reduces lid condensation. This method can be configured to readily take Luminescence, GFP, and RFP measurements in addition to OD. Currently, I most commonly run this on the TC Robot “Meredith”. Bacteria will take around 6 hours to start visibly growing and I usually terminate the experiment at 8 or 12 hours.
Starting an experiment
I start by adding 15ul inducer i.e. IPTG to each well of an empty black 96-well using a multichannel. An overnight culture of bacteria/strains is diluted 1:250 in 2XYT media (not DRM) and 135ul of bacteria is transferred to each well. The act of transfer will help mix the inducer molecules with the diluted bacteria. Pipette in bacteria from lowest inducer concentration to highest to avoid cross-contaminating. After adding bacteria seal your plates using BreathEasy film. Remove both sides of the film in the process and make sure the film is not wrinkled as this will throw off your plate readings. You are now ready to run your experiment.
Configuration
- Change parameters as needed in the params.cfg file located in robot_method/20240616_kinetics_monitoring
- Change desired reader protocol within the kinetics_monitoring2_readeropt.py. E.g. a list such as [‘lum1’, ‘lum1’] or ‘gfp1’ or ‘rfp1’ instead of lum1. The list must be as long as how many plates you configured in params file.
- Change time to terminate experiment, commonly 8 or 12 hours.
- If using fewer than 4 plates, change the sys.sleep time to 5 minutes. When only a couple plates are used they will be read too frequently and do not grow properly because the reader is not at 37C.
- Use the SMART control reader program to open the reader tray for the start of the experiment
Run
>Py kinetics_monitoring2_readeropt.py <yourname> –new
Method: Turbidostat 2024
Written by Emma Chory, Ryan Boileau, and Stefan Golas
Last updated 12.23.2024 RB
Quick Reference Checklist
Before you start:
- Overnight bacteria culture
- 4L DRM with DRM-C and antibiotics added
- Autoclaved deepwell plates
- Washed and sterilized plate lids
- Autoclaved p1000 robot tips and empty tip racks without defects
- Ethanol sprayed and sterilized robot deck
- Emptied big washer
- Fill bleach carboy and add bleach to achieve 5% bleach after water fill
- Media reservoir full bleach rinsed and then media lines flushed with bleach and water
- All non movable plates and autoclaved tips are taped to the racks
- Antibiotics plate has at least 1mL of 10-20x antibiotics in each well
- Turbidostat plates are 150ul of a 1:100 - 1:1000 dilution bacteria culture
- Create accurate and detailed experimental manifest
When you start:
- Tip and plate racks on robot are fully pushed in
- Ensure tight connection between media line and media carboy
- Navigate to the folder turbidostat_20241219 and run >py robot_method175ul1rep.py –new
- If needed, when prompted change the OD setpoints in ..method_local/controller_manifest.csv, default is 0.8
- Press play on Hamilton Run Control
Before you leave for the day:
- Ensure robot is still active
- Ensure liquid levels in washer are appropriate
- Ensure waste carboy and vacuum traps are empty
- Make sure the liquid level alarms are set to “away alarm” in Mocreo
- Fill bleach again if necessary (full carboy takes about 16 hours to empty in this method)
- CLOSE WATER VALVE FOR BLEACH CARBOY
- Activate analysis script to monitor live
- Ensure you have all the necessary reagents and plates if you are inducing in the morning
When adding or changing inducers for your run:
- Replace “antibiotics plate” with new antibiotics + inducers
- Replace both media plates with at least 1mL of DRM media containing your new inducers
Note: Do not replace media plates while they are currently being used and make sure lids are returned to their most recent position if you have to move them.
- Run the analysis code from terminal again, “update your experiment”, and indicate you have added new inducers
Deck Layout Reference
(for both starting and resetting for error_recovery)
Turbidostat Protocol
Summary
This method starts by growing bacteria up from a diluted stock and then maintains them at a standard OD (usually 0.8). While bacteria are equilibrated at a set density users are able to switch out the “antibiotics plate” for a new deep well plate that contains inducer molecules (i.e. IPTG or Arabinose) or small molecules (i.e. NCAAs). This allows you to perform experiments while bacteria are consistently growing in log-phase which is quintessential for the activity of many synthetic circuits we run in the lab. The method will use a platereader to read the changes in signal from a genetic reporter such as luxAB/luciferase.
Starting an experiment
Start with general guidelines described in earlier sections and with a deck as pictured on the previous page. When preparing your growth plates, the default turbidostat volume is 150ul. A 1:100 - 1:1000 dilution of bacteria will take approximately 6-10 hours to start showing growth. A general rule of thumb is that you will need at least 12 hours to equilibrate growth for the induction phase of your experiment
Configuration
Unlike TurboPRANCE, this method uses an antibiotics plate that maps 1:1 with both growth/turbidostat plates. So, inducer/antibiotic molecules in well A1 of the antibiotics plate will be media that is used in wells A1 of growth plate 1 and growth plate 2 and so on with B1, C1, etc... In the case of a double induction experiment with IPTG and Arabinose the highest number of combinations is therefore 8x12. To increase experimental throughput lab members may opt to perform double inductions in a smaller number of combinations covering half the growth plate e.g. 8x6. To do so, strains and the antibiotics plate must be arranged accordingly as below.
<insert diagram of 96 inducer wells to 96x2 growth wells and half runs>
Run
>py robot_method175ul_1rep.py –new
<Other options>
–skip_washer
Skips the washer steps that are normally conducted at the beginning of a method. Useful if you needed to cancel a method very early after starting.
–media_refill
Reformulates media before starting to dilute turbidostat plates again. Useful in the event of an error recovery
–error_recovery
Restarts the method on the last used experimental folder using preexisiting saved turbidostat data. Useful for restarting a method in the middle of a run if a robot error occurs, or if the code needs to be updated.
–simulating
Runs the robot method in a simulated fashion without causing actions with the robot or any equipment. In order for this to work the robot_method code must be changed from windowed=True to simulating=True in the main method loop towards the bottom. This is useful to test the strictly coding aspects of your method. Change it back after your tests!
Induction phase
To quickly change the concentration of any molecules in the turbidostats you must replace the antibiotic+inducer AND media plates. By design media plates always have at least 1mL of media in them. That means if you don’t replace them you will have to wait hours on the robot for it to dilute non-inducer media in the media plates to get to your desired concentration of say IPTG.
Method: TurboPRANCE
Written by Ryan Boileau, at least currently :)
Last updated 12.23.2024 RB
Quick Reference Checklist
Before you start:
- Overnight bacteria culture
- 4L DRM with DRM-C and antibiotics added
- Autoclaved deepwell plates
- Washed and sterilized plate lids
- Autoclaved p1000 robot tips and empty tip racks checked for defects
- Ethanol sprayed and sterilized robot deck
- Empty big washer
- Fill bleach carboy and add bleach to achieve 5% bleach after water fill
- Media reservoir full bleach rinsed and then media lines flushed with bleach and water
- All non movable plates and autoclaved tips are taped to the racks
- Antibiotics plate has at least 1mL of 10-20x antibiotics in each well
- Turbidostat plates are 175ul of a 1:100 - 1:1000 dilution bacteria culture
- Create accurate and detailed experimental manifest
When you start:
- Tip and plate racks on robot are fully pushed in
- Ensure tight connection between media line and media carboy
- In robot_code, lagoon_phase.txt is 0 instead of 1
- Navigate to the folder turbidostat_20241219 and run >py robot_method175ul.py –new
- If needed, when prompted change the OD setpoints in ..method_local/controller_manifest.csv, default is 0.8
- Press play on Hamilton Run Control
Before you leave for the day:
- Ensure robot is still active
- Ensure liquid levels in washer are appropriate
- Ensure waste carboy and vacuum traps are empty
- Make sure the liquid level alarms are set to “away alarm” in Mocreo
- Fill bleach again if necessary (full carboy takes about 16 hours to empty in this method)
- CLOSE WATER VALVE FOR BLEACH CARBOY
- Activate analysis script to monitor live
- Ensure you have all the necessary reagents and plates if you are inducing in the morning
When adding or changing inducers for your run:
- Replace “antibiotics plate” with new antibiotics + inducers
- Replace both media plates with at least 1mL of DRM media containing your new inducers
Note: Do not replace media plates while they are currently being used and make sure lids are returned to their most recent position if you have to move them.
- Run the analysis code from terminal again, “update your experiment”, and indicate you have added new inducers
Deck Layout Reference
(for both starting and resetting for error_recovery)
TurboPRANCE protocol
Summary
This method starts by growing bacteria up from a diluted stock and then maintains them at a standard OD (usually 0.8). While bacteria are equilibrated at a set density users are then able to manually switch into lagoon phase. In this phase, bacteria that are normally placed in waste after well dilutions are instead trafficked to lagoons where continuous evolution commences. Lagoon plates are sampled periodically into 384w plates which are read out on the plate reader to monitor evolution live, as most circuits produce LuxAB in addition to pIII when a circuit is active. In the current version of TurboPRANCE, to initiate evolution, phage must be manually spiked into the lagoons after lagoon densities have stabilized.
Starting an experiment
Start with general guidelines described in earlier sections and with a deck as pictured on the previous page. When preparing your growth plates, the default turbidostat volume is 175ul. A 1:100 - 1:1000 dilution of bacteria will take approximately 6-10 hours to start showing growth. A general rule of thumb is that you will need at least 12 hours to equilibrate growth and initiate lagoon phase of your experiment. In TurboPRANCE, in order to provide enough fresh bacteria/flowthrough rate to evolutions we utilize “replicate groupings”. For a typical replicate grouping of 2, this means turbidostat columns 1 and 2 are both diluted and transferred to a single column of lagoon wells. Strains, inducers, antibiotics, and lagoons must be arranged accordingly (See Configuration below).
Configuration
The TurboPRANCE has the highest degree of customization out of our methods. Use the master_manifest.csv to specify the mappings of liquid transfers between turbidostats, lagoons, and phage starter wells. Here you can also specify ODs of turbidostats and volumes of various operations including lagoon flow rate.
When running replicate experiments such as in TurboPRANCE, set up the antibiotic, inducer, and turbidostat plates as shown in the examples below, where replicates are done column-wise:
Run
Py robot_method175ul.py –new
<Other options>
–skip_washer
Skips the washer steps that are normally conducted at the beginning of a method. Useful if you needed to cancel a method very early after starting.
–media_refill
Reformulates media before starting to dilute turbidostat plates again. Useful in the event of an error recovery
–skip_media_refill
Skips media refill at the onset of a new experiment. Useful while developing methods and doing wet test-runs or when a method stopped immediately after the initial media formulation and before turbidostats have started to equilibrate
–error_recovery
Restarts the method on the last used experimental folder using preexisting saved turbidostat data. Useful for restarting a method in the middle of a run if a robot error occurs, or if the code needs to be updated.
–simulating
Runs the robot method in a simulated fashion without causing actions with the robot or any equipment. In order for this to work the robot_method code must be changed from windowed=True to simulating=True in the main method loop towards the bottom. This is useful to test the strictly coding aspects of your method. Change it back after your tests!
Lagoon Phase
After initiating an experiment and the turbidostats have equilibrated with bacteria at the desired density it is now possible to proceed to the next step called Lagoon Phase. Here, after the turbidostats are serviced by the 8-core pipettes, a specified volume of excess bacteria is transferred to library tubes in the lagoon plates instead of directly to waste. After several transfers the lagoons will equilibrate in density. At this point phage can be introduced and directed evolution will begin to take place. Notably, once you start lagoon phase the turbidostats remain fixed in the rate of their dilution and gain “chemostat” behavior.
To switch to lagoon phase navigate to ../..TurboPRANCE/lagoon_phase.txt and change the 0 to 1.
In the current version of TurboPRANCE, the method will only run as long as there are 384w sample plates. Sampling periodicity of “3” will last approximately 36 hours, enough to evolve T7RNP for pT3 as published.
The current version of TurboPRANCE requires manual phage addition to the lagoons using a multichannel pipette. Future versions will feature a plate containing phage covered in foil that, after reaching a trigger event, will automatically be transferred to a lagoon of your choice.
The current version of TurboPRANCE has a static manifest, running only experiments that start and end at similar times and for a defined length of time. Future versions of the method will enable dynamic manifest changes which will enable triggered events, and multi-user experimentation through job scheduling.
2x replicates (Replicate wells =
(A1, A2) (A3, A4)... (H11,H12):
| 1 | 2 | 1 | 2 | ||||||||
| 1 | 2 |
3x replicates (Replicate wells =
(A1-A3) (A4-A6)... (H10-H12):
| 1 | 2 | 3 | 1 | 2 | 3 | ||||||
| 1 | 2 | 3 |
4x replicates (Replicate wells =
(A1-A4) (A5-A8)... (H9-H12):
| 1 | 2 | 3 | 4 | 1 | 2 | 3 | 4 | ||||
| 1 | 2 | 3 | 4 |
6x replicates (Replicate wells =
(A1-A6) (A7-A12)... (H7-H12):
| 1 | 2 | 3 | 4 | 5 | 6 | 1 | 2 | 3 | 4 | 5 | 6 |
| 1 | 2 | 3 | 4 | 5 | 6 |
Method: Turbidostat - KEIO version
Written by Ryan Boileau, at least currently :)
Last updated 12.23.2024 RB
Quick Reference Checklist
Before you start:
- Overnight bacteria culture
- 4L DRM with DRM-C and antibiotics added
- Autoclaved deepwell plates
- Washed and sterilized plate lids
- Autoclaved p1000 robot tips and empty tip racks without defects
- Ethanol sprayed and sterilized robot deck
- Emptied big washer
- Fill bleach carboy and add bleach to achieve 5% bleach after water fill
- Media reservoir full bleach rinsed and then media lines flushed with bleach and water
- All non movable plates and autoclaved tips are taped to the racks
- Antibiotics plate has at least 1mL of 10-20x antibiotics in each well
- Turbidostat plates are 150ul of a 1:100 - 1:1000 dilution bacteria culture
- Create accurate and detailed experimental manifest
When you start:
- Tip and plate racks on robot are fully pushed in
- Ensure tight connection between media line and media carboy
- Navigate to the folder turbidostat_20241219 and run >py robot_method175ul1rep.py –new
- If needed, when prompted change the OD setpoints in ..method_local/controller_manifest.csv, default is 0.8
- Press play on Hamilton Run Control
Before you leave for the day:
- Ensure robot is still active
- Ensure liquid levels in washer are appropriate
- Ensure waste carboy and vacuum traps are empty
- Make sure the liquid level alarms are set to “away alarm” in Mocreo
- Fill bleach again if necessary (full carboy takes about 16hours to empty in this method)
- CLOSE WATER VALVE FOR BLEACH CARBOY
- Activate analysis script to monitor live
- Ensure you have all the necessary reagents and plates if you are inducing in the morning
When adding or changing inducers for your run:
- Replace “antibiotics plate” with new antibiotics + inducers
- Replace both media plates with at least 1mL of DRM media containing your new inducers
Note: Do not replace media plates while they are currently being used and make sure lids are returned to their most recent position if you have to move them.
- Run the analysis code from terminal again, “update your experiment”, and indicate you have added new inducers
Deck Layout Reference
(for both starting and resetting for error_recovery)
KEIO Turbidostat Protocol
Summary
Starting an Experiment
Configuration
Run
Harvest phase
V. Error Recovery or Manual Restart
Error recovery
If you need to stop the robot mid-run or if the robot hits an error, you can restart the method with error recovery.
- Replace missing tips with unused tips from a fresh tip box.
- Run ../unit_tests/bleach_and_rinse_tips.py to wash tips currently in the dirty tip racks and put them back into the clean rack.
- Replace plates and lids exactly where they were at the beginning of the experiment, see reference on page 2.
- Make sure there are no plates in the plate reader.
- Run “py robot_method.py --error_recovery” from the command line.
Manual restart
You may want to manually restart the method during a run, such as to update code. The best time to do this is after a full dilution cycle has been completed and the robot has finished rinsing tips. Then, simply restart with error recovery as above.
VI. Method and Code Base Reference
Liquid Handling Using pyHamilton
General Robot Method Architecture in the Chory Lab
How to Test pyHamilton Code by Simulating a Robot Run
The Experimental Folder and Raw Data Output Structure
Analysis Code Structure and Modules
Reference Table - Inducer formulation
| Water (ul) | Stock (ul of 1M Ara) | Final in inducer plate (12ul of stock into 1mL, 20x) | Final in media (uM) |
|---|---|---|---|
| 0 | 1000 | 12000 | 600 |
| 333 | 666 | 4000 | 200 |
| 800 | 200 | 2000 | 100 |
| 900 | Serial Dilution | 1200 | 60 |
| 900 | Serial Dilution | 400 | 20 |
| 900 | Serial Dilution | 200 | 10 |
| 900 | Serial Dilution | 120 | 6 |
| 1000 | 0 | 0 |
| Water (ul) | Stock (ul of 1M IPTG) | Final in inducer plate (12ul of stock into 1mL) | Final in media (uM) |
|---|---|---|---|
| 0 | 1000 (A) | 12000 | 600 |
| 333 | 666 (B) | 4000 | 200 |
| 800 | 200 (C) | 2000 | 100 |
| 900 | Serial dilution (AA) | 1200 | 60 |
| 900 | Serial dilution (BB) | 400 | 20 |
| 900 | Serial dilution (CC) | 200 | 10 |
| 900 | Serial dilution | 120 | 6 |
| 900 | Serial dilution | 40 | 2 |
| 900 | Serial dilution | 20 | 1 |
| 900 | Serial dilution | 12 | 0.6 |
| 900 | Serial dilution | 4 | 0.2 |
| 1000 | 0 | 0 | 0 |
VII. Troubleshooting Guide
Common Errors - Robot
- If a method unexpectedly quits or you force quit a method and a pump is not stopping, unplug and replug the power source for the pump array
- If an error occurs while the iSWAP gripper arm is holding a plate or lid, Hamilton Run Control will show you a window that gives you the option to open the gripper after a certain amount of time. If you increase the time and press open you can catch the plate or lid in time before it drops. This is especially important for a turbidostat plate where a dropped plate probably gets media+bacteria all over the lid or the deck.
- If an error occurs while the Core-8 channels have tips attached, Hamilton Run Control will prompt you to determine if there are any collisions if the channels were to move. If you select “no” the Core-8 will automatically dump the attached tips in the waste chute by the plate reader.
- If an error occurs while the 96head has tips attached, Hamilton Run Control will prompt you first if there are any collisions, if you say “no”, then the prompt will ask if you want to put tips back to their origin rack or trash them. Note: Always choose “put them back” to avoid collision with the washer which is close to the 96head waste chute and a mess of tips and liquid all over the place.
- If an error occurs while the 96 head has tips attached and you are not prompted by Hamilton Run Control to perform any actions, it is possible to manually detach the tips or manipulate the 96head using Hamilton Run Service. If you manually control the 96head like this you will need to turn the robot off and on to reset the homing for the component. This is especially important for D-axis/drive which is the pipetting function of the 96 head.
- When starting a new method, if the robot method on the command line freezes when waiting on the ClarioSTAR there may be a communication error between the plate reader and the method. This often occurs when a run errors out in the middle of a plate reading. Restarting the computer and then trying to run your method again usually solves this issue.
- If the method code is not working as intended or the robot is moving without Hamilton Run Control window popping up. Someone may have been using the simulation version of the code (“simulating=True”). In the __main__ Hamilton for loop towards the bottom of the robot_method script double check the code is running in “windowed=True” mode.
- If there is indication that the pumps are not operating correctly, that is cannot fill or drain as expected,
- If the media carboy filter is clogged it will create a vacuum within the carboy and prevent media from being transported to the deck during media formulation. This will result in lower than expected media volumes in media plates as well as bubbles in the turbidostats as the robot is transferring air on accident.
Common Errors - Biology
- Turbidostat wells that have constantly rising growth rates and or are overgrowing and no longer able to maintain a set OD are likely to have contamination in the media plates. You may be adding growing bacteria into your wells instead of fresh media. The most likely source we see is usually back contamination from the turbidostats back into their respective media wells. This may happen because bleaching tips is not effective or a mishap during error_recovery where tips were not cleaned. Consider starting your next method with a deeper clean of the robot. Switching out media plates consistently over time will also hedge against this possibility. Validate levels of tip washing in single washer and main washer are appropriate.
- When all or some turbidostat wells are not growing or growing abnormal compared to the rest this is a sign that the wells may have had trace bleach exposure. Validate levels of tip washing in single washer and main washer are appropriate.
Synced 15 October 2026 from the Drive document · Open in Drive · All documentation