How to use the app
This manual covers everything the app can do once it is installed. The first part is for everyone in your group, the second is for admins who approve and place orders, and the last part walks through every page of the owner's Settings.
Installing the app is covered in the setup guide that comes with your approval email. Some features only appear when the owner turns them on under Settings > Features, so you may not see every page described here.
1. Signing in and your profile
Your first sign-in
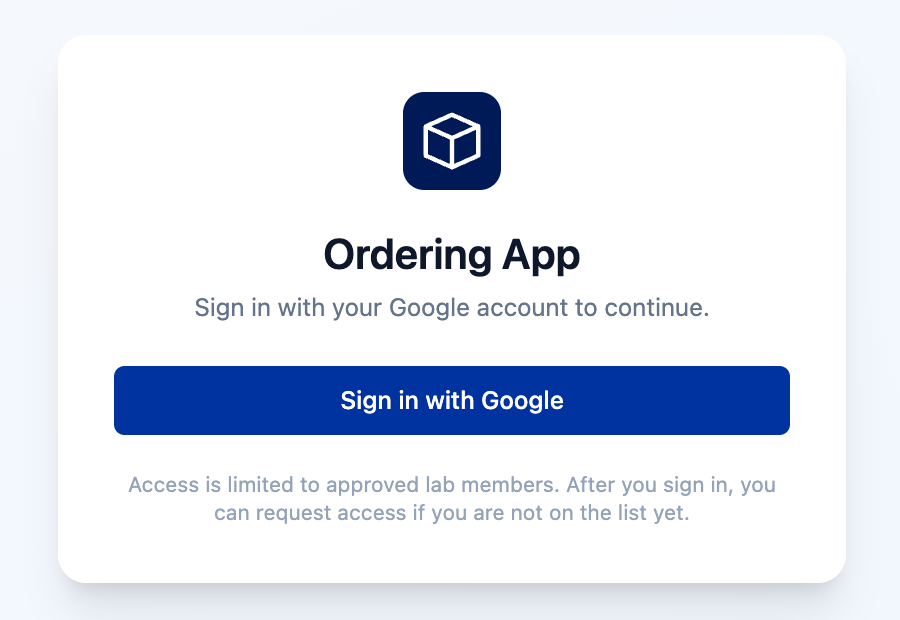
- Open the app's link and click Sign in with Google.
- If you are not on the list yet: Enter your full name and click Submit request. An admin will approve you and choose your role, and you can come back later and click Check again.
- If you were given an access code: Enter it on the same screen and you will be let in straight away with the role that code grants.
- If you were invited: Sign in with the address the invitation was sent to and you will land straight in the app.
Signed in with the wrong Google account? Sign out on that screen and sign back in with the right one.
Your profile menu
Click your name in the top right corner to open your profile menu.
- Upload photo: Adds your picture to the header and the People page. Until you add one, the app shows your institution's logo or your initials.
- Default grant for new requests: Pre-selects the grant you charge most often, so you do not have to pick it on every request.
- Sign out: Signs you out of the app only, not out of your Google account.
manual-profile-menu.pngFinding your way around
The top bar has the pages you will use most: Orders, Catalog, Stock Items, Chemicals and, when groups are on, My Budget. Everything else is under More, including Vendors, Login Info, Grants, Locations, Categories, People, Analytics, Standing POs and Internal Codes. You only see the pages your role is allowed to use.
The Feedback button sends a problem or suggestion to whoever runs your copy of the app.
The app refreshes itself in the background every so often. If someone else just changed something, click Refresh all data in the sidebar. When the app has been updated, a banner at the bottom will ask you to reload.
2. The Orders page
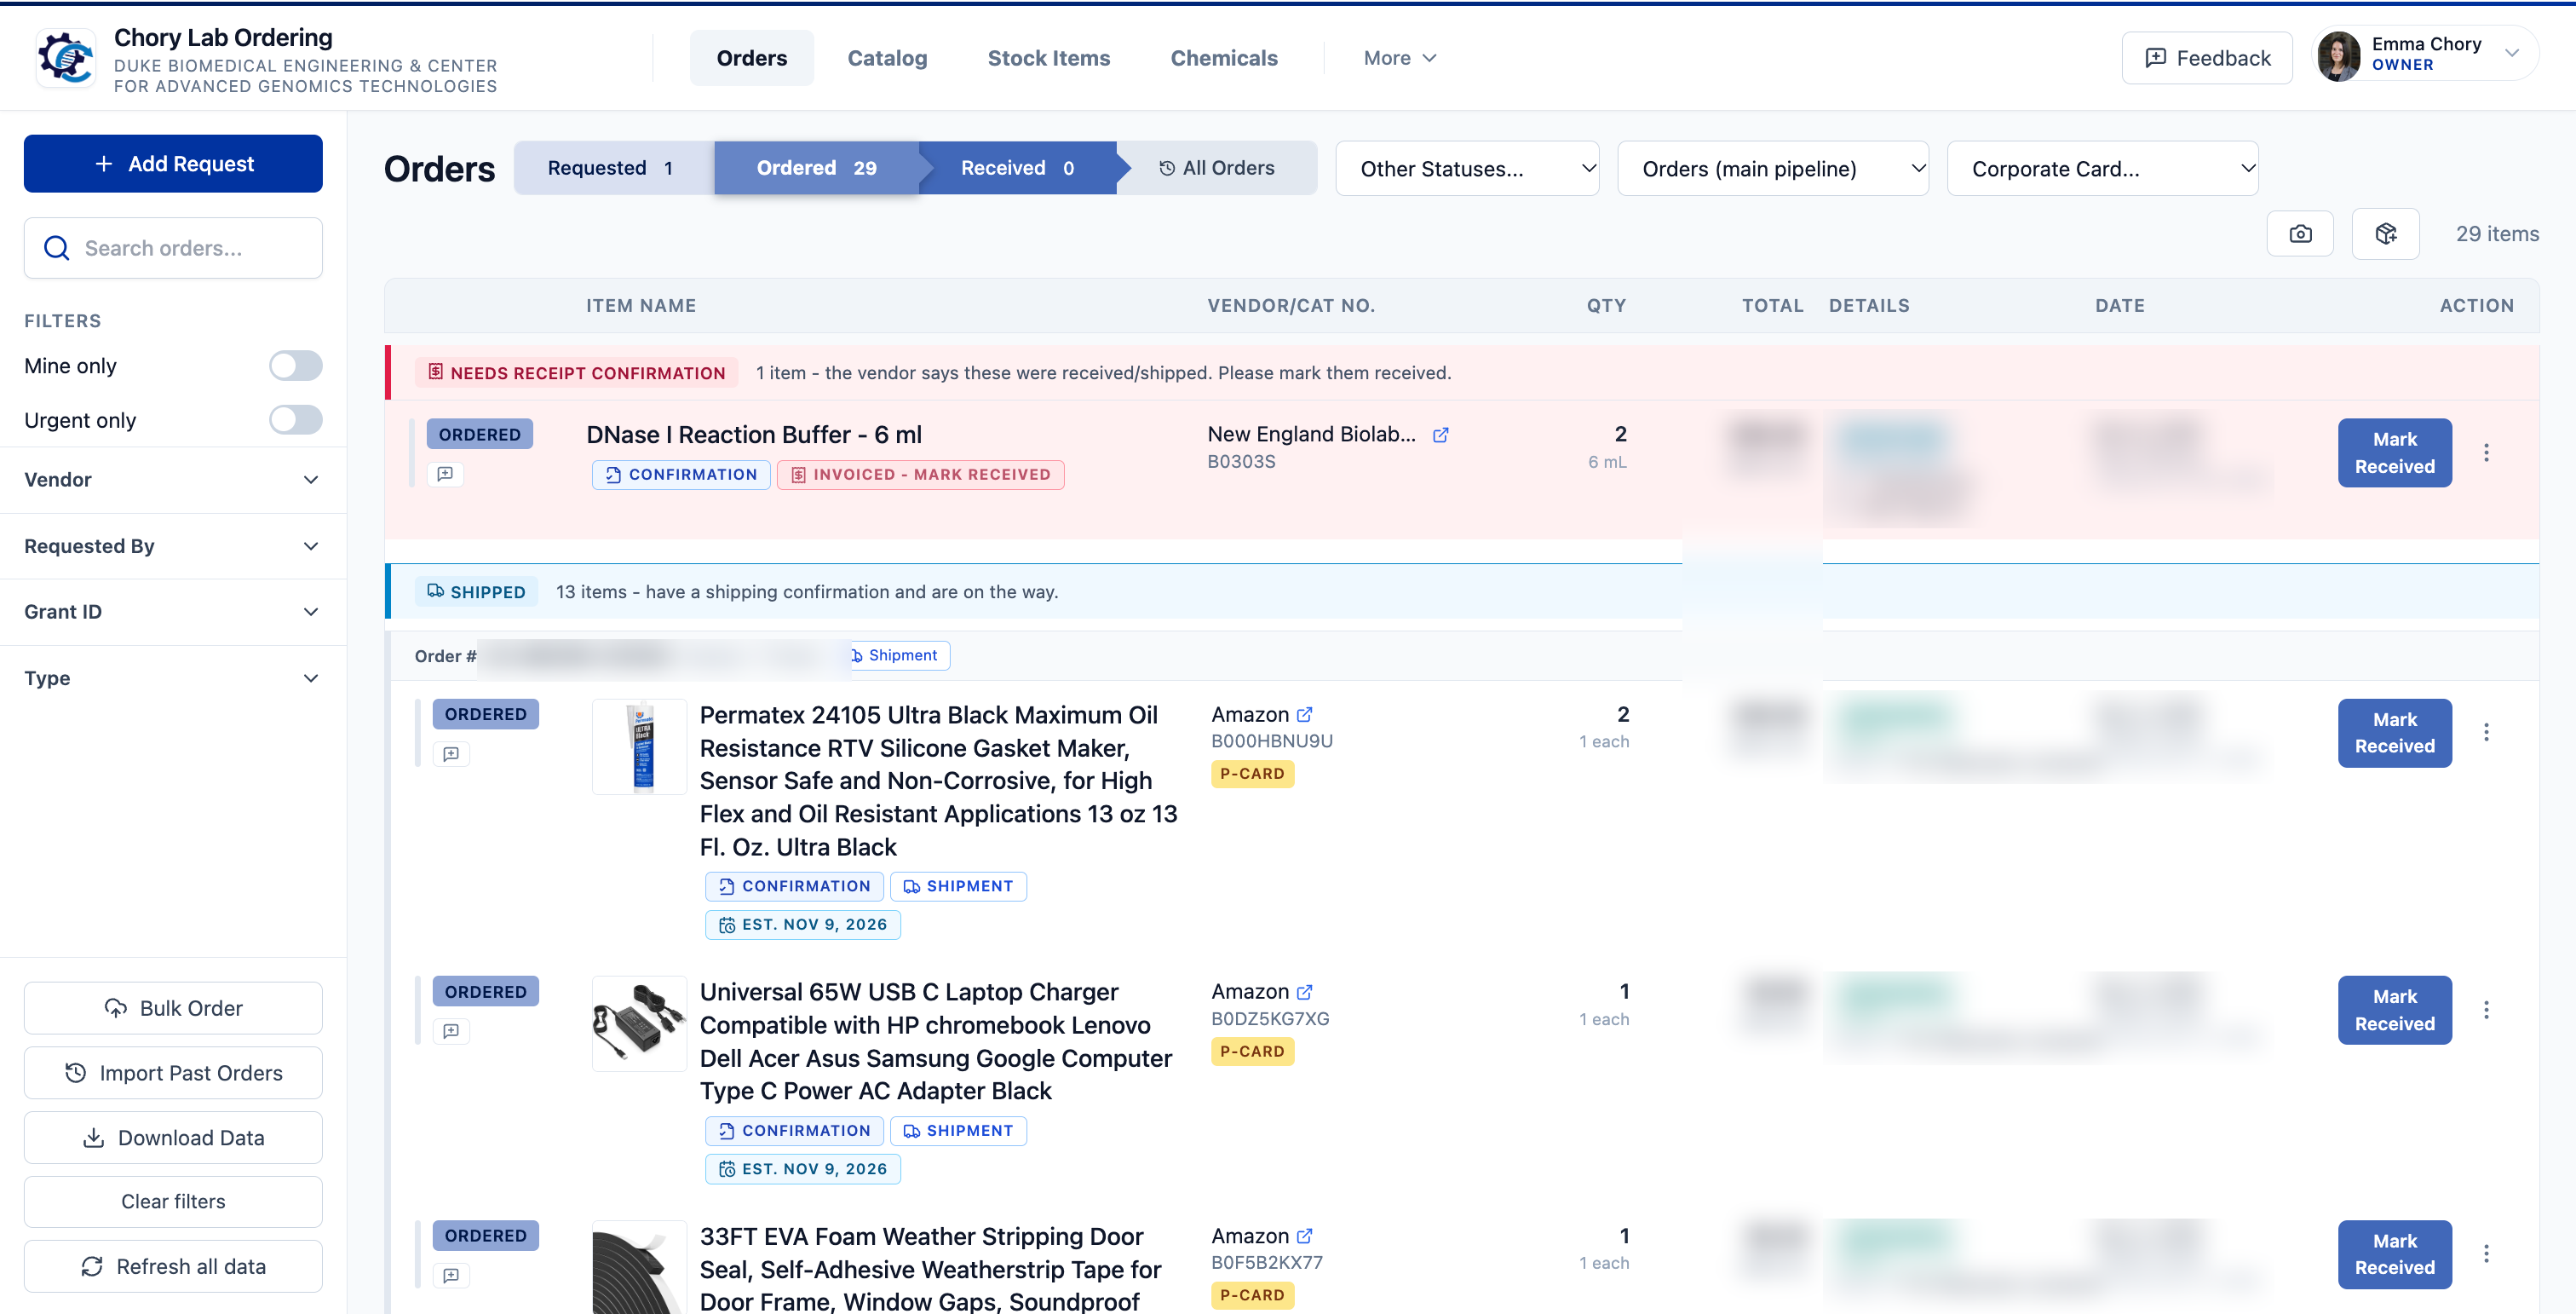
The Orders page is the heart of the app. Orders move left to right through four stages, and the number on each tab tells you how many are waiting there.
| Awaiting Approval | Orders over your lab's dollar limit, waiting for an approver. |
|---|---|
| Requested | Approved requests waiting for an admin to place them. |
| Ordered | Placed with the vendor and on the way. |
| Received | Arrived and put away. Orders that still need a step in your institution's purchasing system wait here. |
Other Statuses shows backordered, confirmed and cancelled orders, and All Orders shows everything, a page at a time.
Search and filters
- Search: The search box matches item names, vendors and catalog numbers.
- Mine only and Urgent only: Quick switches in the sidebar for your own orders or anything marked urgent.
- Filters: Narrow the list by vendor, who requested it, grant or type. Click Clear filters to start over.
- Download Data: Exports the orders you are looking at as a CSV file.
manual-filters.pngBadges on an order
Small colored pills on each order tell you what is going on without opening it.
- Urgent is orange, and a red pulsing flag means a vendor or purchaser reported a problem.
- Partial means only some of the order has arrived so far.
- When order email intake is on, pills appear as the vendor's confirmation, shipping and delivery emails arrive, and a Track pill opens the carrier's tracking page.
- A New attachment section floats an ordered item to the top when someone adds a document after it was placed.
3. Requesting an item
Click Add Request at the top of the sidebar. Fields marked with a star are required.
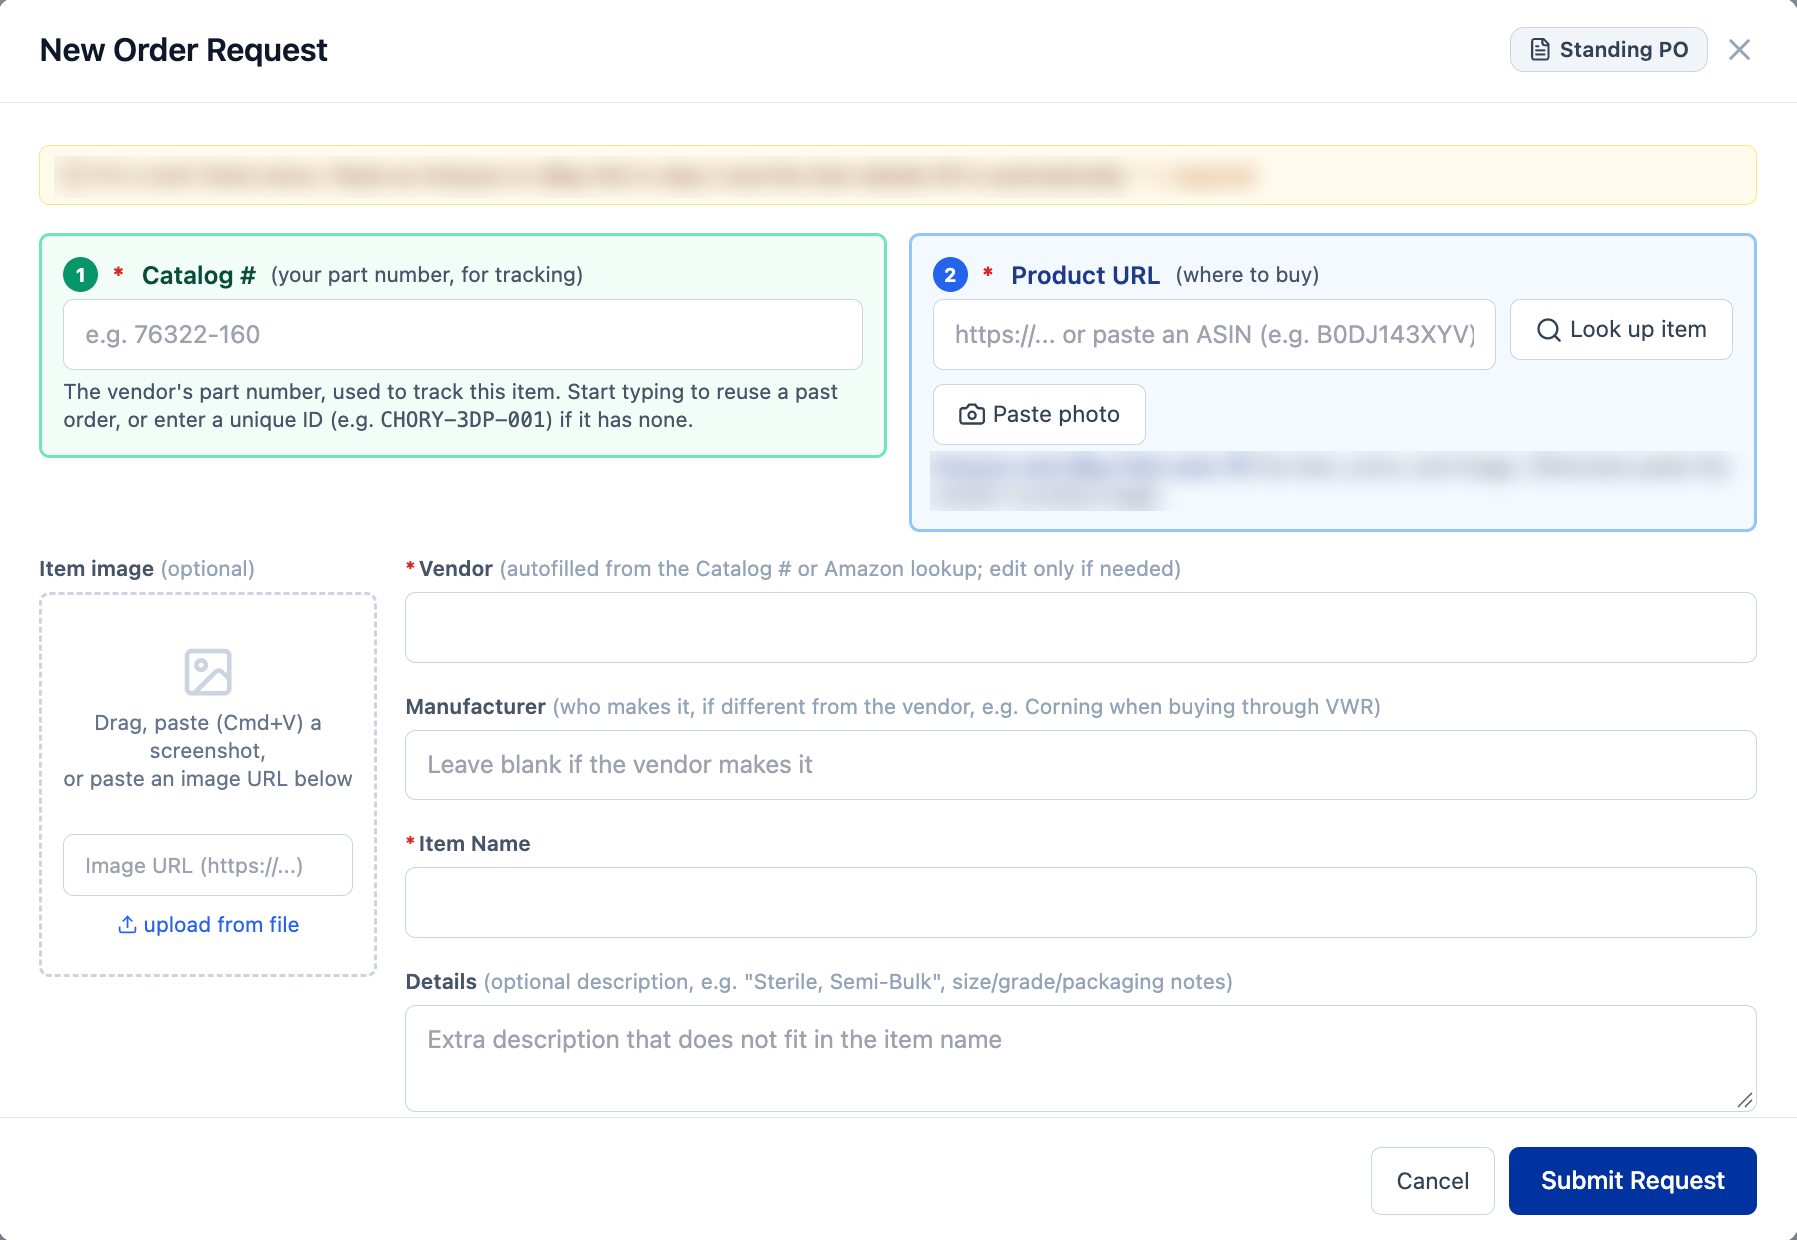
- Catalog number first: Start typing the vendor's part number. If your lab has ordered it before, the app fills in the vendor, name, link, picture, pack size and last price. If the item has no part number, click Generate ID.
- Product link: Paste the vendor's product page. For something new, the app offers pictures from that page to choose from.
- Picture: Optional. Drag, paste (Cmd+V or Ctrl+V) a screenshot, paste an image link, or upload a file.
- Vendor and manufacturer: The vendor is who you buy from. Add the manufacturer only if it is different, for example Corning when buying through VWR. A yellow note under the vendor shows any ordering instructions your admins saved for it.
- Unit or pack size: What one item is, as a count and a unit, with an optional container, for example 500 mL, 10 plates or 5 plates per case. Use 1 each for single items.
- Quantity and unit price: How many you want at that price. The total is calculated for you.
- Price comparisons: Optional. Add the list price or a competing vendor's price, and the app will track how much your lab saves.
- Request details: Who it is for, the grant, the type and subcategory. Tick Urgent if it cannot wait, Common item for shared lab supplies, or Split between multiple fund codes to divide the cost.
- Attachments: Add quotes, competing quotes, terms or forms, and pick a type for each. If your lab has uploaded a form for that type, you can download the blank template or click Fill out / preview to fill it in from the order.
- Ship to: The lab's default address is pre-selected. Anything going elsewhere is flagged for the purchaser, and you can save a new address for everyone.
- Justification and notes: If your lab requires a justification, one specific sentence is enough. Notes go to whoever places the order.
- Item discount code and stock item: Optional. Add a discount that applies only to this item, or count it toward a stock item such as gloves or tips.
- Click Submit.
Several items on one quote
Click Bulk Order in the sidebar when one quote covers several items. The vendor, grant and quote are entered once, and each line becomes its own order so it can be received separately. If you start a single request and attach a quote, the form will offer to switch to a bulk order for you.
manual-bulk-order.pngDNA orders
When DNA ordering is on, a DNA order button appears on the Orders page for oligos, primers, ultramers, gene fragments and sequencing. Paste your sequences, pick the vendor, scale and purification, and the app estimates the cost from the prices your owner set.
manual-dna-order.pngRequesting a standing PO
A standing (blanket) PO is a long-lived purchase order that a grant holds with one vendor. Choose the Standing PO type on a request and the form switches to the vendor, grant, total amount and term. It goes through approval like any other order, and the PO number is added when it is placed.
manual-standing-po-request.png4. Following an order
Click any order to open its details.
- Notes: A comment thread on the order. Use it to ask the purchaser a question or explain a substitution, so the conversation stays with the order instead of in someone's inbox.
- Documents: Quotes, forms, vendor confirmations and shipping notices, all opened in the app's viewer. You can add more at any time.
- History: Who requested, approved, ordered and received it, and when.
- Propose a change: If you spot a mistake on an order that is already moving, edit it and your change is sent to an admin to approve. You can cancel your own requests while they are still waiting.
- Getting low: Once an item is stored, you can flag it as getting low so whoever orders next knows to reorder.
manual-order-detail.png5. Receiving an order
When a package arrives, whoever unpacks it should click Mark Received on the order. It only takes a few seconds, and it is the record your institution needs that what was paid for actually arrived.
- How many arrived: If only part of the order came, enter how many. The order stays in Ordered with a Partial badge until the rest arrives.
- Where it went: Pick the room and, if you like, a sublocation such as a shelf or freezer. For one-off spots, use the location notes, for example "top shelf of the fridge".
- Storage box: For tubes, vials and other small items, you can pick the exact box and slot.
- Cold storage: Items that must be kept cold ask you to confirm they were put away at the right temperature.
- Click Save.
Anyone can mark their own items received, and you can mark several at once with Mark items received. If the order still needs a goods receipt in your institution's purchasing system, it waits in the Received tab until an admin confirms it there.
manual-receive.png6. Catalog
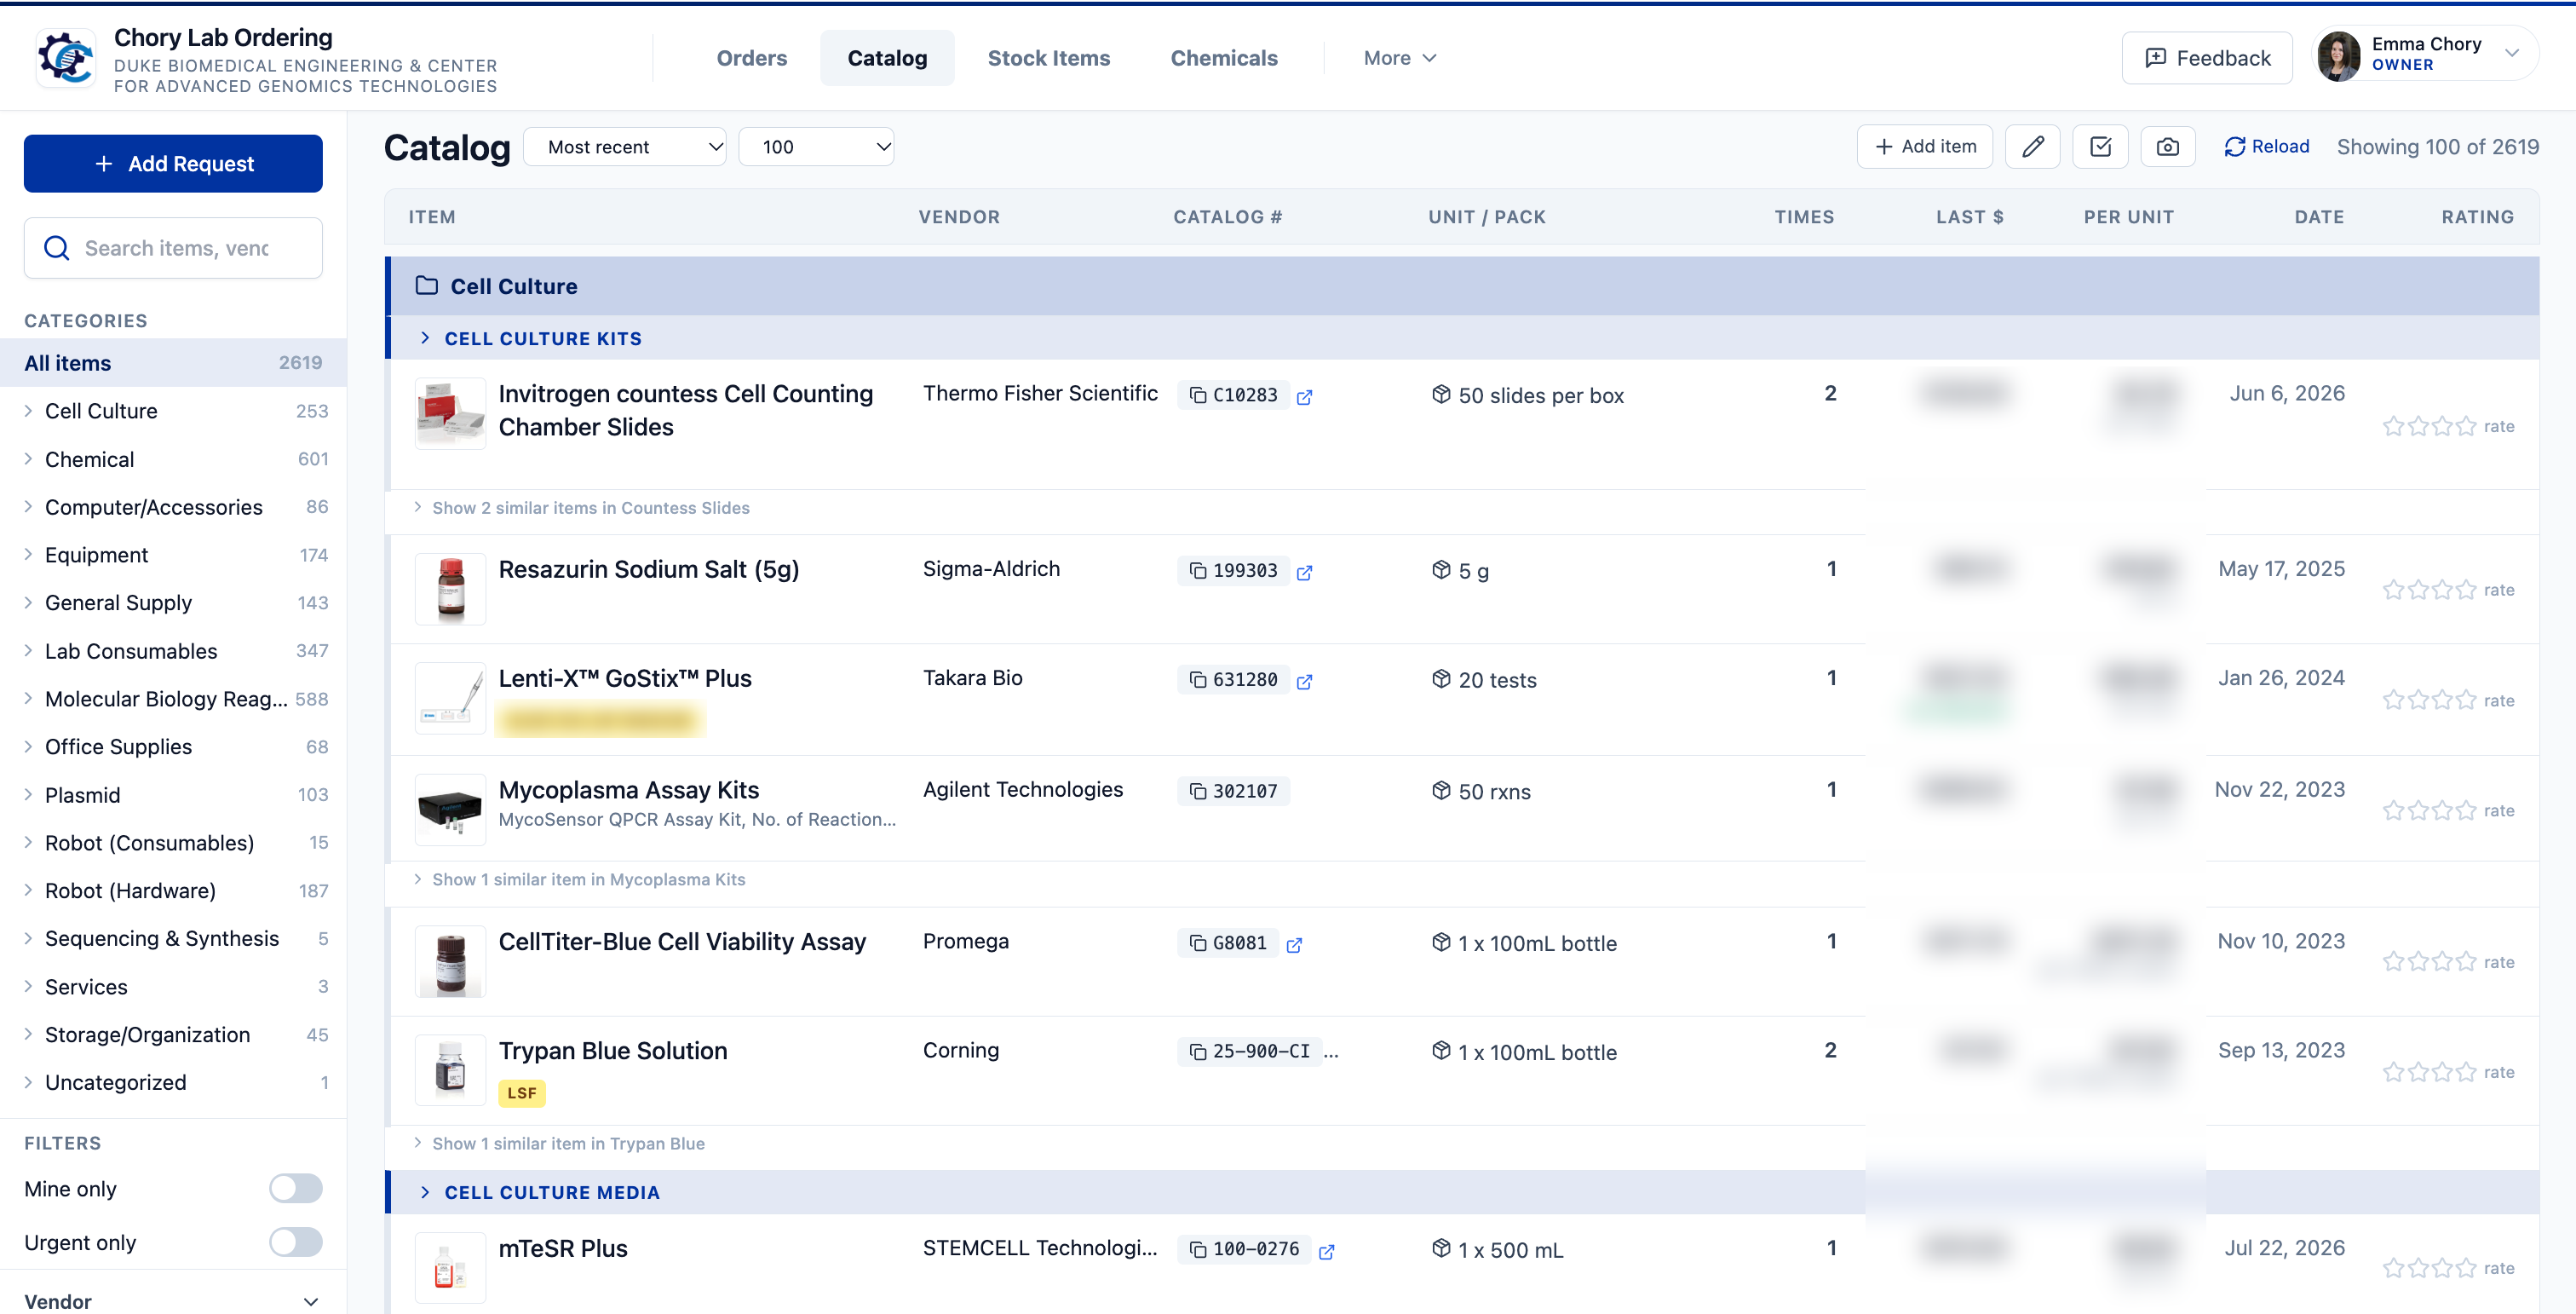
The catalog is built from everything your lab has ordered, plus any items your owner imported. It is usually the fastest way to reorder.
- Browse and search: The left sidebar lists categories and subcategories with counts, and the search box matches names, vendors and catalog numbers.
- Sort: By most recent, most ordered, most spent or name.
- Price per unit: Each item shows the last price paid and the price per unit, so packs of different sizes are easy to compare.
- Order history: Click an item to see every past order of it, who ordered it and what was paid.
- Where is it? Shows where each past order of an item was put away.
- Ratings: Rate an item from one to four stars and leave a note, so your lab learns which brands work.
- Add item: Add something your lab has not ordered yet, either by hand or from the vendor's product page.
In stock mode. When you first set up the app, use Organize and turn on in stock mode. A plus sign appears next to every item your lab has never ordered, and clicking it records that you already have one on the shelf.
Editing the catalog. Editors and admins can fix an item's name, link, picture, pack size or category from the catalog. A change made here is copied to every past order of that catalog number, so the whole history stays consistent. Admins can also select several items at once to set a grant or pack size in bulk.
manual-catalog-item.png7. Stock items
Stock items track the things your lab should never run out of, such as gloves, 1000 µL tips or 50 mL conicals, no matter which vendor or catalog number they came from.
- Click New stock item and give it a name and unit.
- Attach the catalog items that count toward it. A box of tips from two different vendors can both count toward "1000 µL tips".
- Enter how many you have, the par level you want to keep, and the point at which to reorder.
Each stock item shows as OK, Low or Out, with the last order and the vendors used. Filter by status to see what needs reordering, and mark one catalog item as the preferred source.
manual-stock.png8. Chemicals
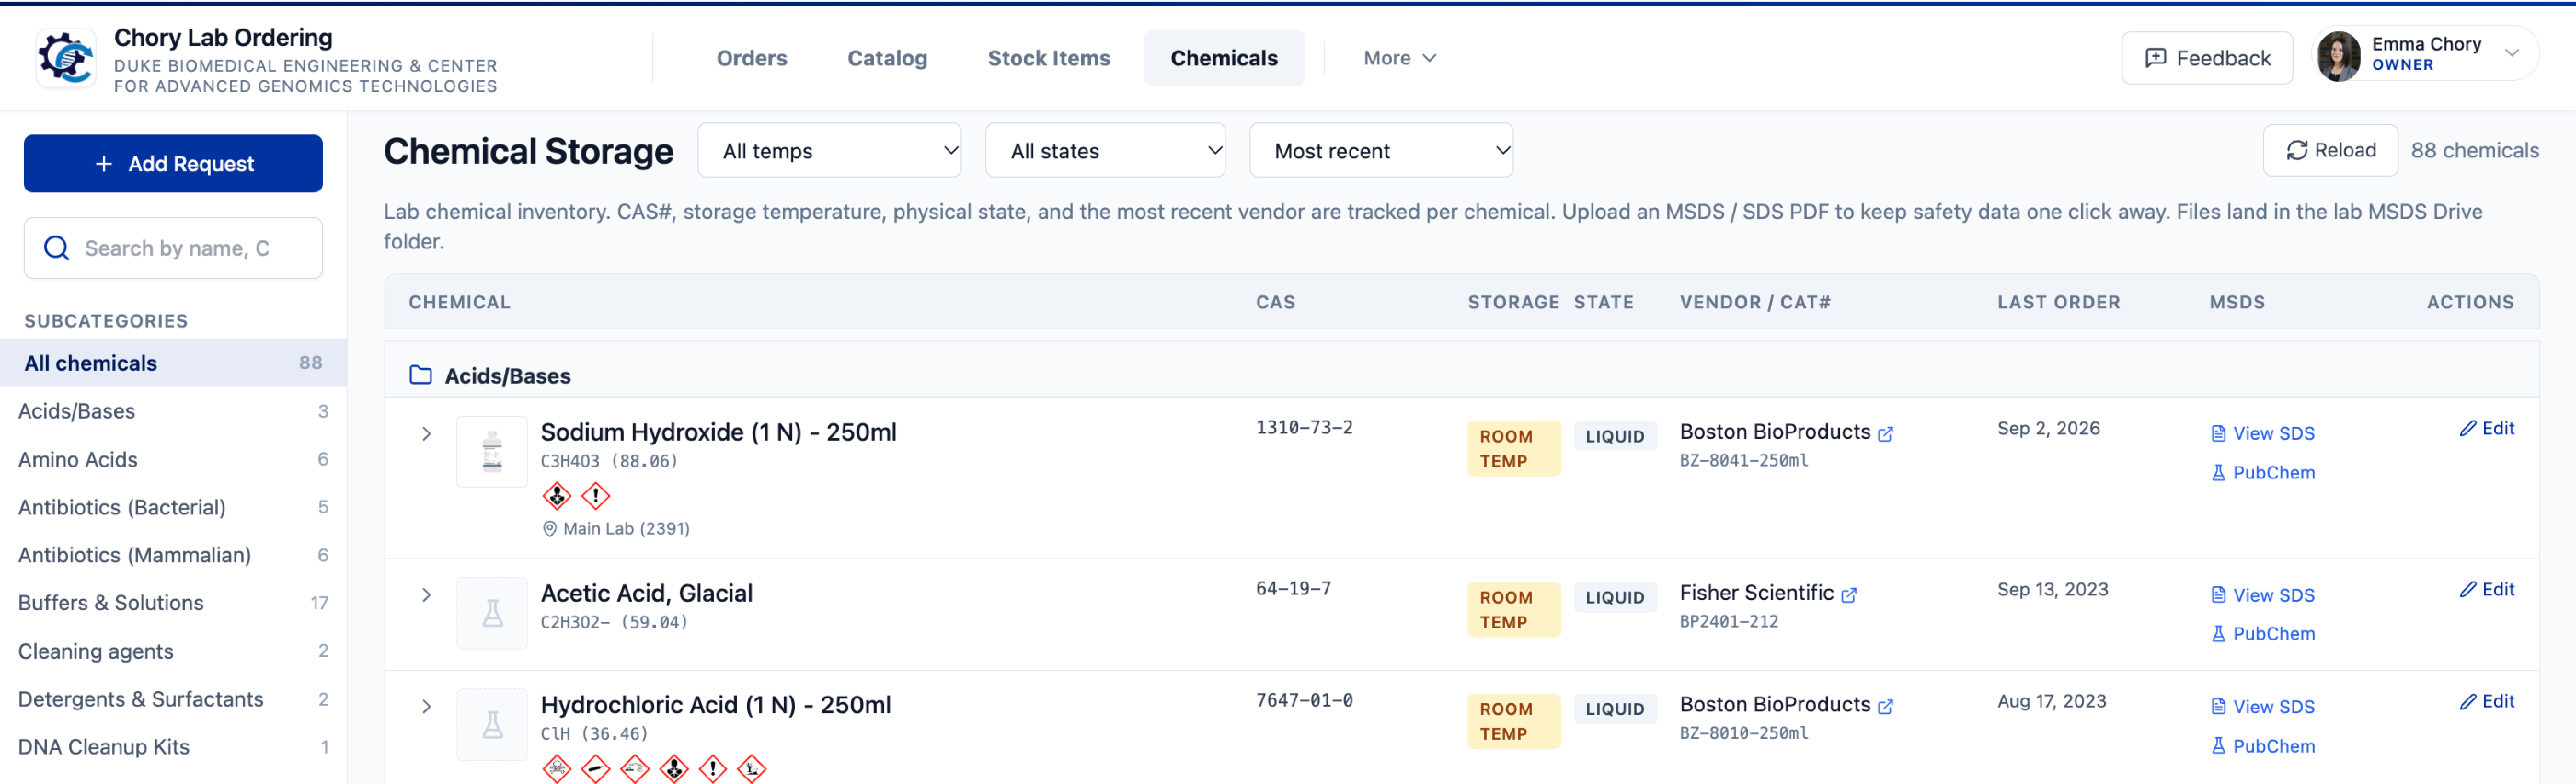
The Chemicals page is your lab's chemical inventory. It is filled in automatically from chemical orders, so it stays current without anyone keeping a separate list.
- Each chemical shows its CAS number, storage temperature, physical state, latest vendor and last order.
- Filter by storage temperature or state, or sort by name, CAS number or most ordered.
- Upload a safety data sheet (SDS or MSDS) so it is one click away. Your copy already includes safety sheets and hazard symbols for the starting chemicals.
manual-chemicals.png9. Vendors and discount codes
Each vendor has a card with its logo and how your lab orders from it. Click a card to see the vendor's ID, ordering notes, sales rep, website and any discount codes.
- Save discount code: Anyone can save a promo code with what it is for and when it expires. It shows on the vendor and to whoever places the next order.
- Add vendor: Admins and editors can add vendors, logos and purchase methods.
- Merge duplicates: Combines two records for the same company and moves their orders onto one.
manual-vendors.png10. Login Info
Login Info keeps the lab's shared accounts in one place, so nobody has to ask who knows the password.
- Vendor logins: Accounts on vendor websites that are not tied to a purchasing card. Editors and admins add and edit them.
- Equipment logins: Robots, instrument computers and other lab equipment. Anyone can add or edit one.
Passwords stay hidden until you click to reveal them. The owner can also require a separate password to open this page. Please keep purchasing card credentials out of it, and use your institution's password vault for anything that can move money.
manual-logins.png11. Grants
The Grants page lists the grants and fund codes you are allowed to charge. Click one to see guidance on what to charge to it. Admins can add grants, choose who can spend on each, set default categories, and write that guidance.
manual-grants.png12. Locations and storage boxes
Locations are the rooms, freezers, shelves and racks that show up when someone marks an order received.
- Locations: Add a main location, such as a room, then sublocations inside it.
- Storage map: Lay out shelves, racks and rows, with the boxes on each.
- Boxes: Browse every box and what is in each slot. Boxes can be common lab, group or personal, and can hold plasmids, strains, cell lines, primers, antibodies and other reagents as well as ordered items. To add many boxes at once, use Import from sheet.
manual-storage-box.png13. Categories
Categories (types) and their subcategories organize the catalog and analytics. Editors and admins can add, rename, move and merge them. Renaming or merging updates every matching order and the chemical inventory, and the app saves a backup of the orders first.
14. My Budget
When groups are turned on, for example for course teams, each person belongs to a group with its own budget. My Budget shows how much your group has spent and what is left. Items marked as common lab supplies are not counted against it. Depending on how the owner set it up, an order that would go over budget is either blocked or allowed with a warning.
manual-my-budget.png15. Approving orders
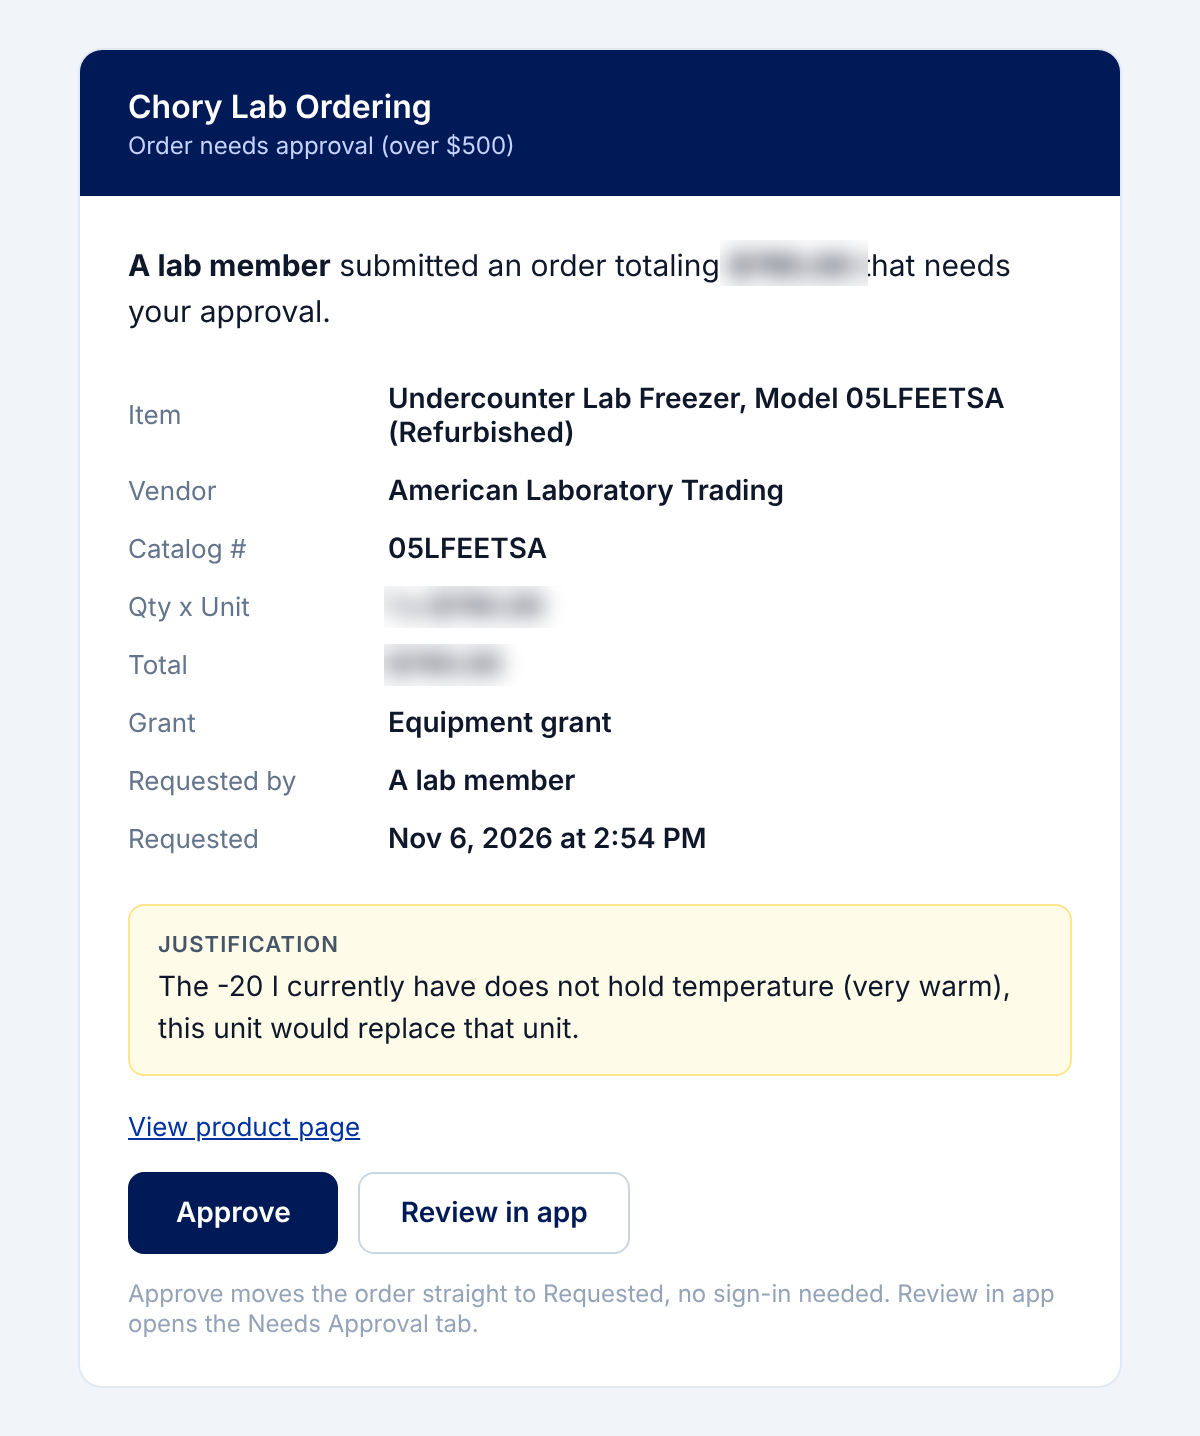
Orders over your lab's approval limit wait in Awaiting Approval until an admin-approver or the owner signs off.
- From the app: Open the order, check it, and click Approve. It moves to Requested.
- From email: Approvers get an email with an Approve button that works without signing in. The link only works for the person it was sent to, and a second click never approves twice.
- Save for later: Parks an order you are not ready to place yet.
- Trainees: When a trainee's order is over the mentor limit, their mentor gets an email to double-check it.
16. Placing orders
The Requested tab is organized the way orders are actually placed. Requests are grouped by purchase method (for example punch-out, catalog, vendor ID or P-card), then by vendor, and items that can go in the same cart are grouped together. Items with their own quote are listed separately so they can be entered by hand.
manual-requested-tab.pngMark as ordered
- Place the order with the vendor or in your institution's purchasing system. Click any colored chip on the order (item name, catalog number, quantity, price or vendor ID) to copy it, so you can paste instead of retyping.
- Click Mark Ordered on the order.
- Check the price and quantity, choose the purchase method, and enter the cart number or the vendor's order number. Add shipping and, for P-card orders, tax.
- Click Mark Ordered. The requester gets an email, and the Slack message gets its first reaction.
manual-mark-ordered.png- Bulk mark ordered: Tick several orders from one vendor, enter one cart number, and the app splits shipping and tax across them in proportion to price.
- Bulk edit: Change the category, grant or urgency of several orders at once.
- Copy row: If your purchasing system's cart or punch-out is not working, copy the order as one line for its bulk upload sheet.
- P-card receipts: Orders placed on a P-card can email a record, with the quote attached, to the address your owner set.
17. After an order is placed
- Backordered: Mark an order backordered so the requester knows it will be late.
- Purchase order numbers: When order email intake is on, the PO number is written onto every order in a cart as soon as your purchasing system emails it. You can also enter it by hand.
- Goods receipt: Orders with a PO that still need a receipt in your purchasing system wait in Received until you confirm them there, then move to Confirmed.
- Invoiced but not received: When an invoice arrives for something nobody has marked received, the order floats to the top of Ordered and a reminder goes to Slack.
- Undo a step: An admin can move an order one step back if it was marked by mistake, or cancel it with a reason.
18. People and roles
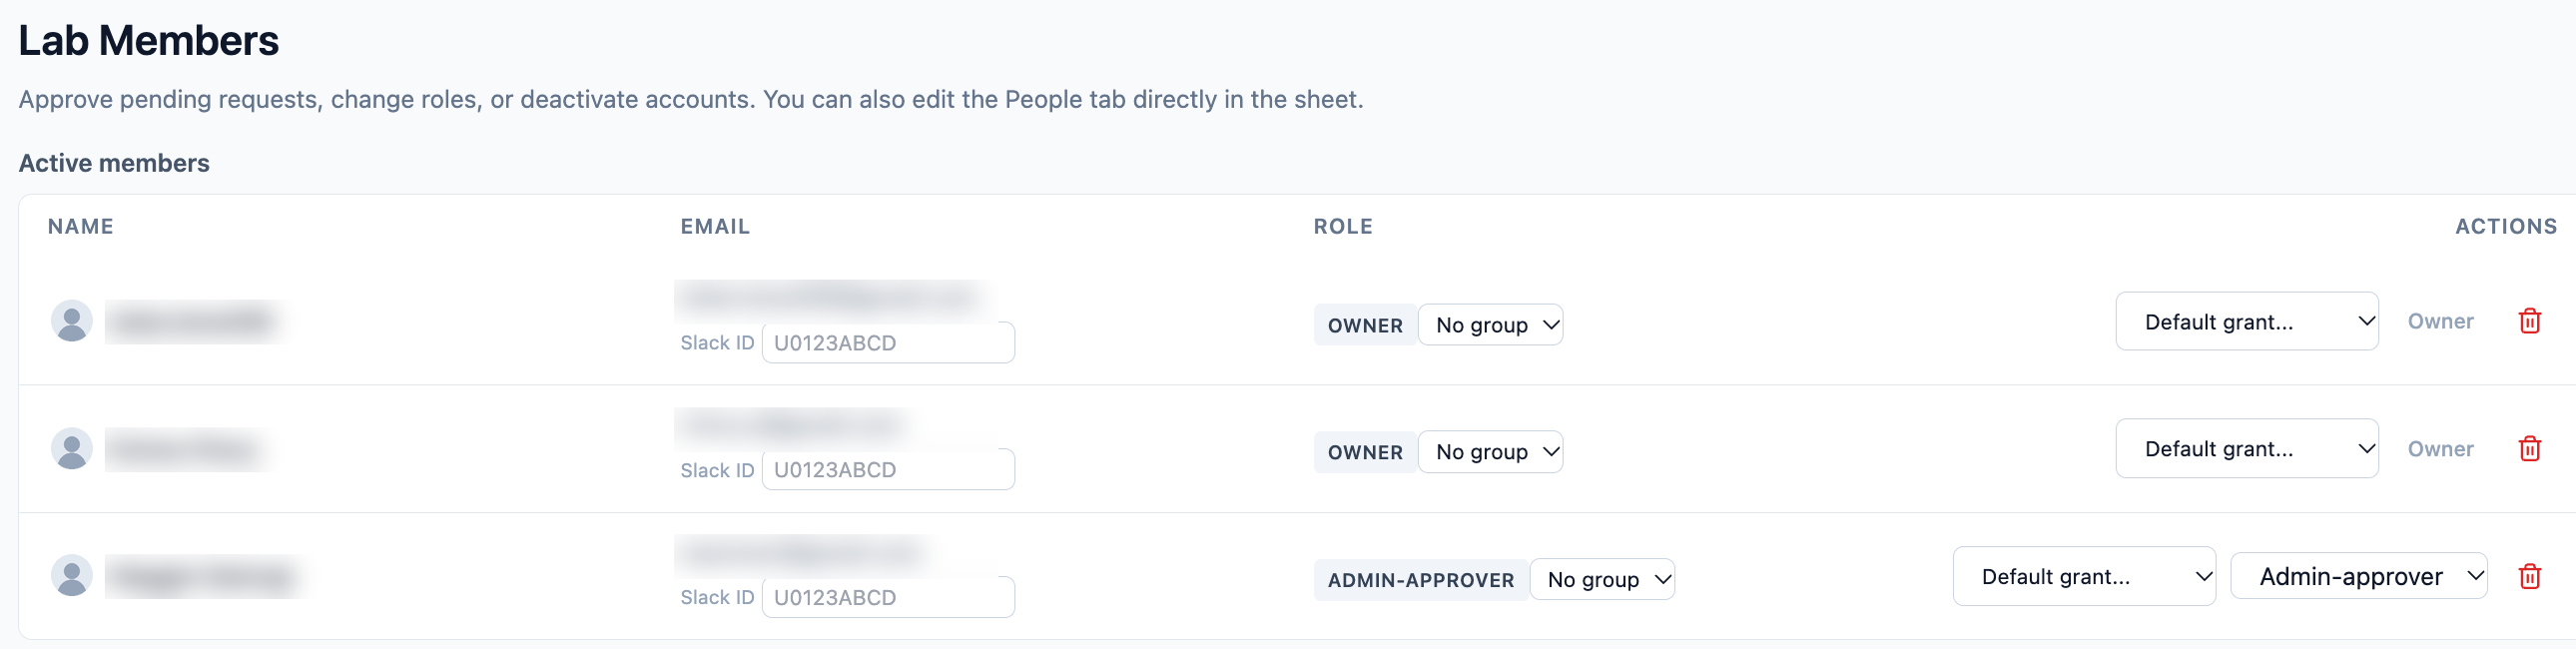
Admins and the owner manage everyone from More > People.
- Pending requests: Approve people who asked for access and pick their role.
- Invite people: Enter Google addresses and a role in advance, with an optional note. They land straight in the app the first time they sign in, and you can revoke an invitation before it is used.
- Active members: Change someone's role, assign a mentor to a trainee, add a Slack member ID, or deactivate someone who has left.
- Groups: When groups are on, add groups with a budget and put each person in one.
| Role | What it can do |
|---|---|
| Owner | Everything, including Settings. |
| Admin-approver | Everything except Settings, plus approving orders over your dollar limit. |
| Admin | Places orders and manages people, vendors, the catalog and budgets. |
| TA | For courses. Approves orders and assigns students to teams. |
| Editor | A requester who can also tidy up categories, vendors, stock and locations. |
| Requester | Requests items, marks them received, and cancels their own pending requests. |
| Trainee | A requester whose larger orders are double-checked by a mentor. |
| Viewer | Can look but not change anything. |
19. Standing POs and internal codes
Standing POs. More > Standing POs lists every blanket PO your grants hold, with the vendor, amount, term and PO number. POs within a few months of expiring are flagged in red, so they can be renewed in time. Admins can add one by hand and attach its PDF, and when someone requests a standing PO for a vendor that already has one, the app shows it so nobody opens a second.
manual-standing-pos.pngInternal codes. More > Internal Codes lists the account codes your purchasing system asks for, such as GL accounts or material groups. Each vendor can have its own codes, and the app fills them in when you copy an order into your purchasing system.
20. Analytics
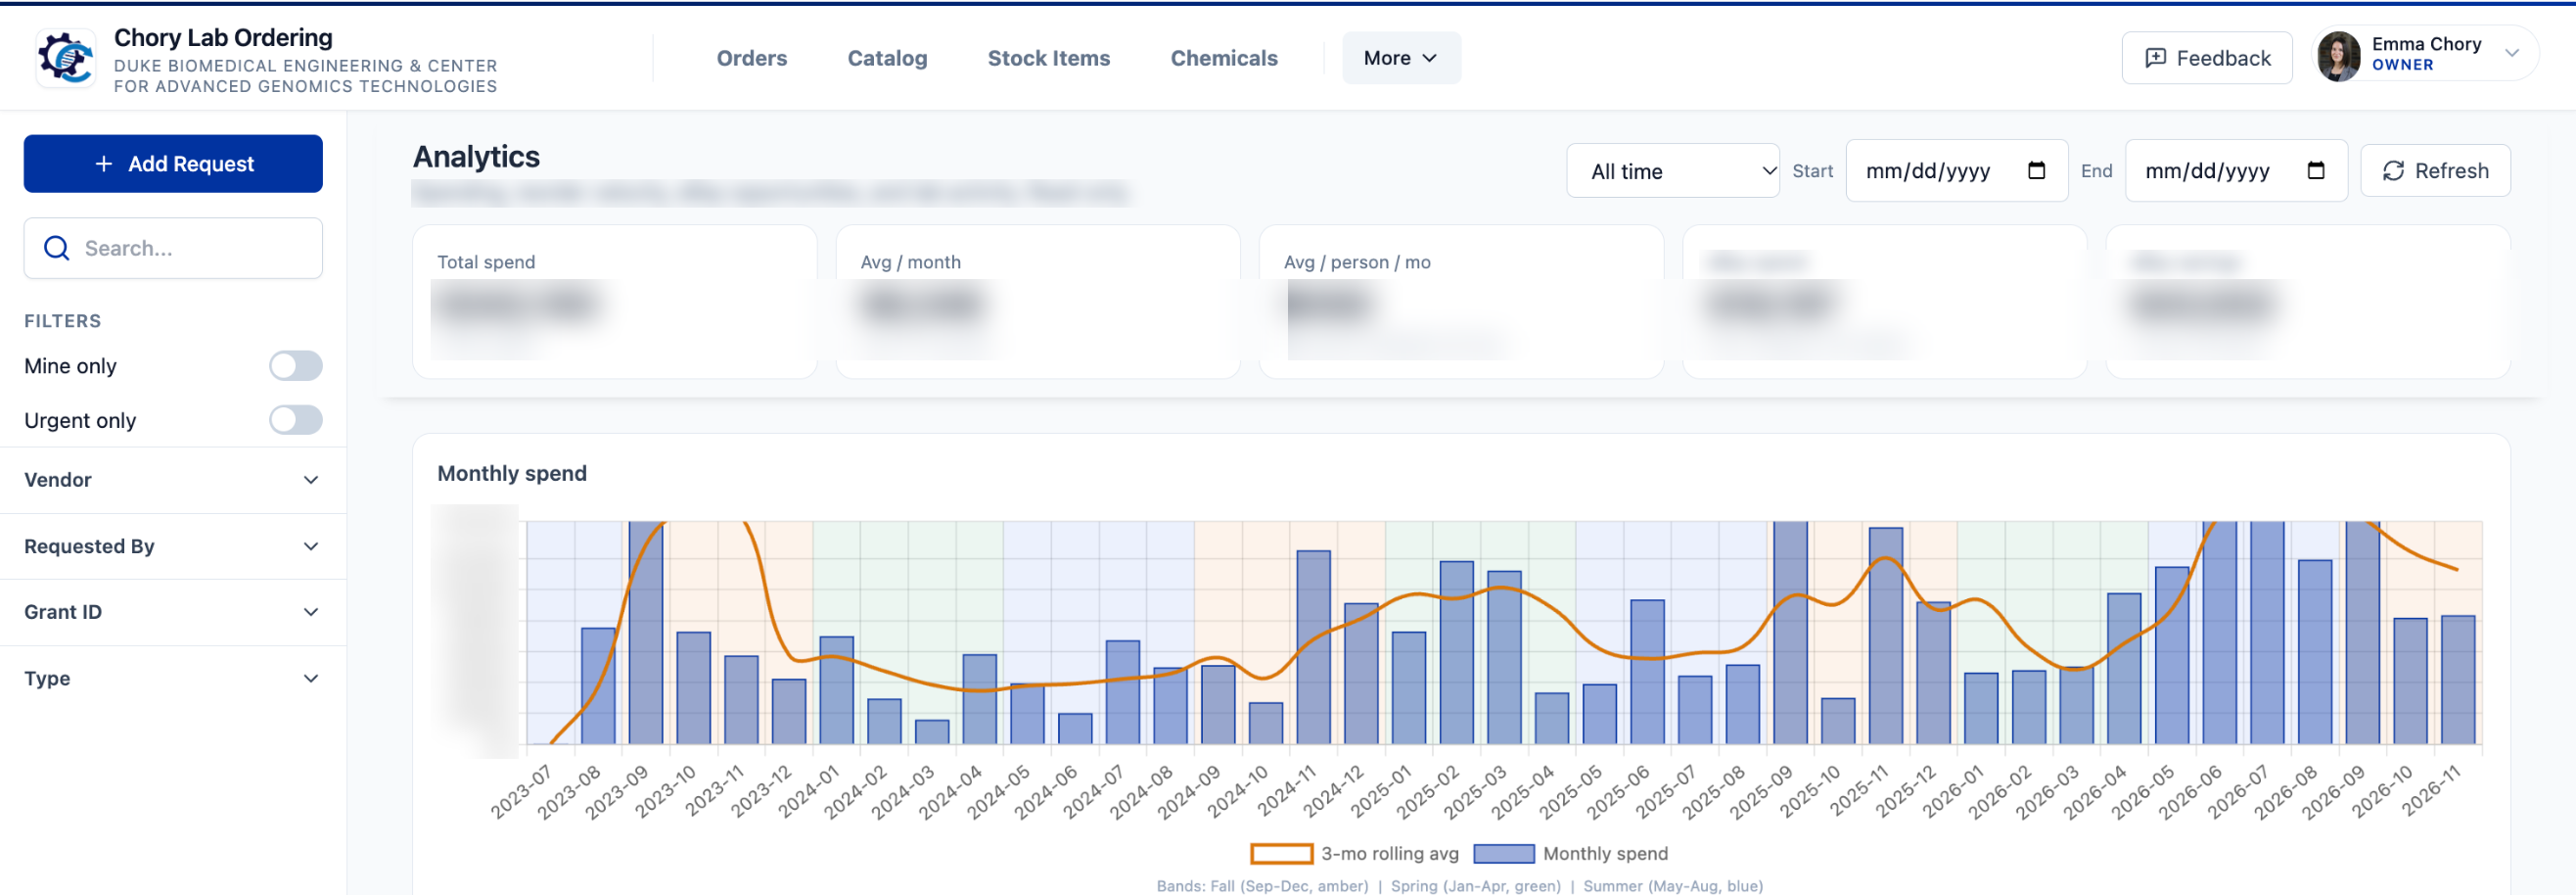
The owner's Analytics page is built from your orders, so it needs no extra bookkeeping. Pick a date range, a semester or a custom range at the top.
- Spending: Total spend, average per month and per person, and monthly spend with a rolling average.
- Categories: Where the money goes, by category and subcategory.
- Top items: What your lab buys most, averaged per year.
- Savings: How much you saved against list prices.
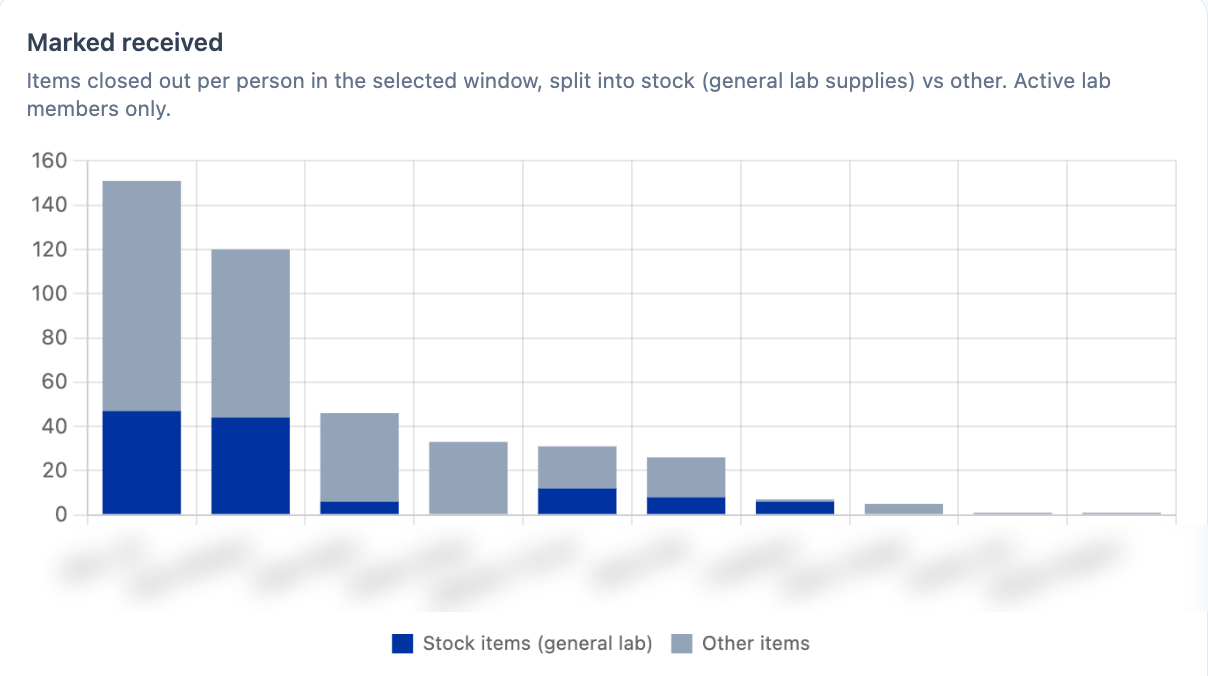
- People and receiving: Who orders and who marks things received, split between common supplies and everything else, so you can see whether one person is carrying the load.
- Group budgets: When groups are on, spending against each group's budget.
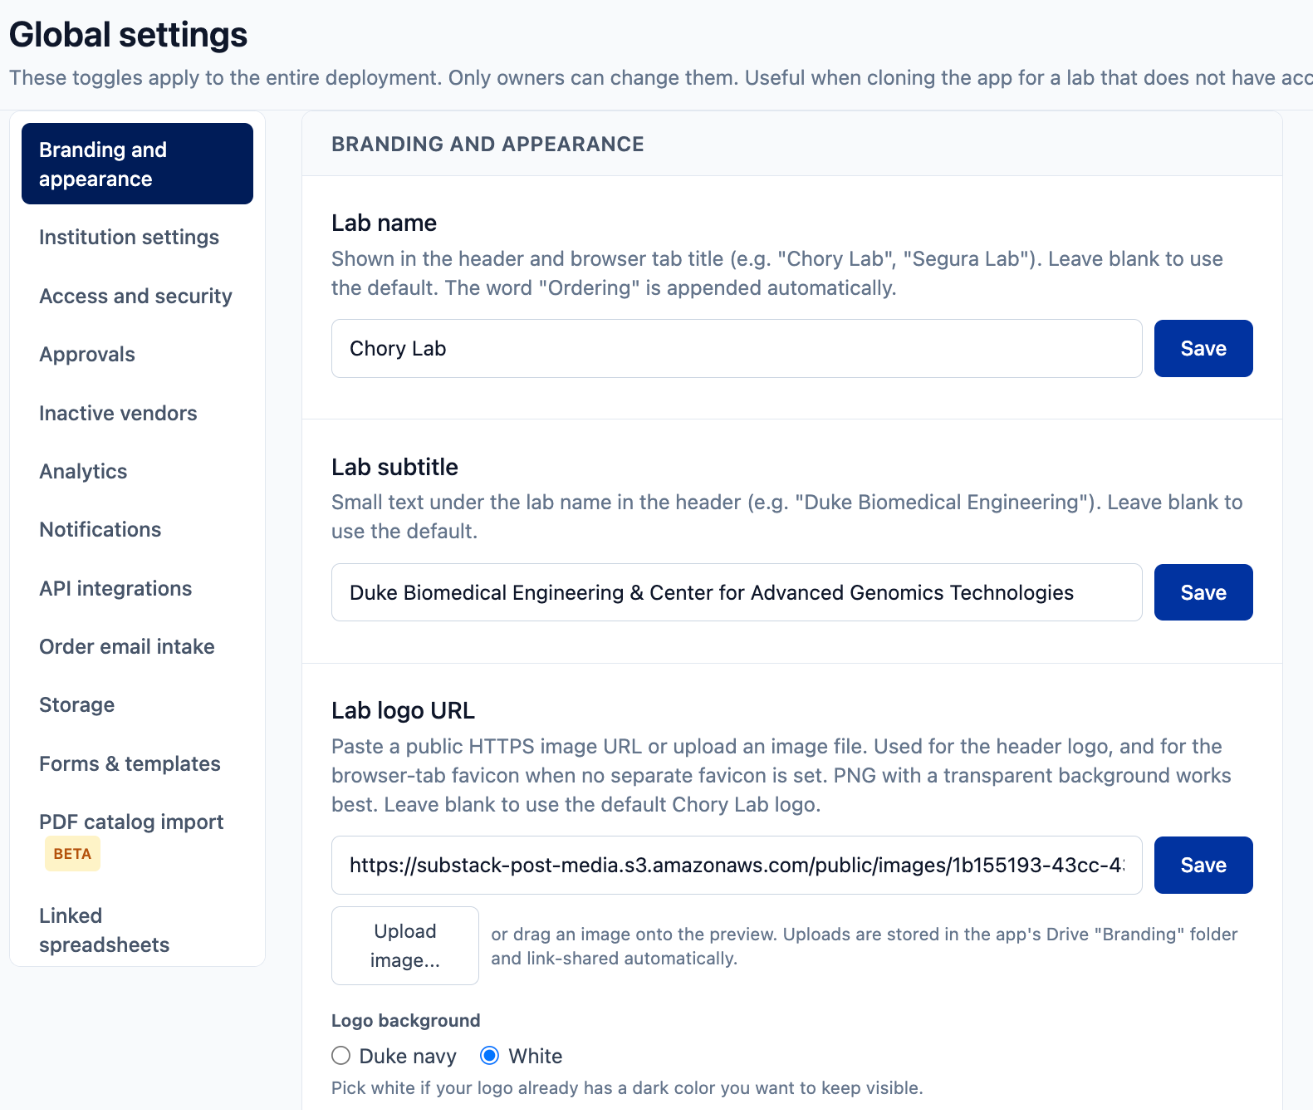
Only the owner can open Settings, from the profile menu. The menu on the left is grouped into sections, and a feature that is turned off disappears from both the app and this menu. Nothing it stored is deleted, so turning it back on brings everything back. Secret values such as the sign-in secret, the Slack token and API keys are kept in the script's private storage, never in the spreadsheet.
21. Setup settings
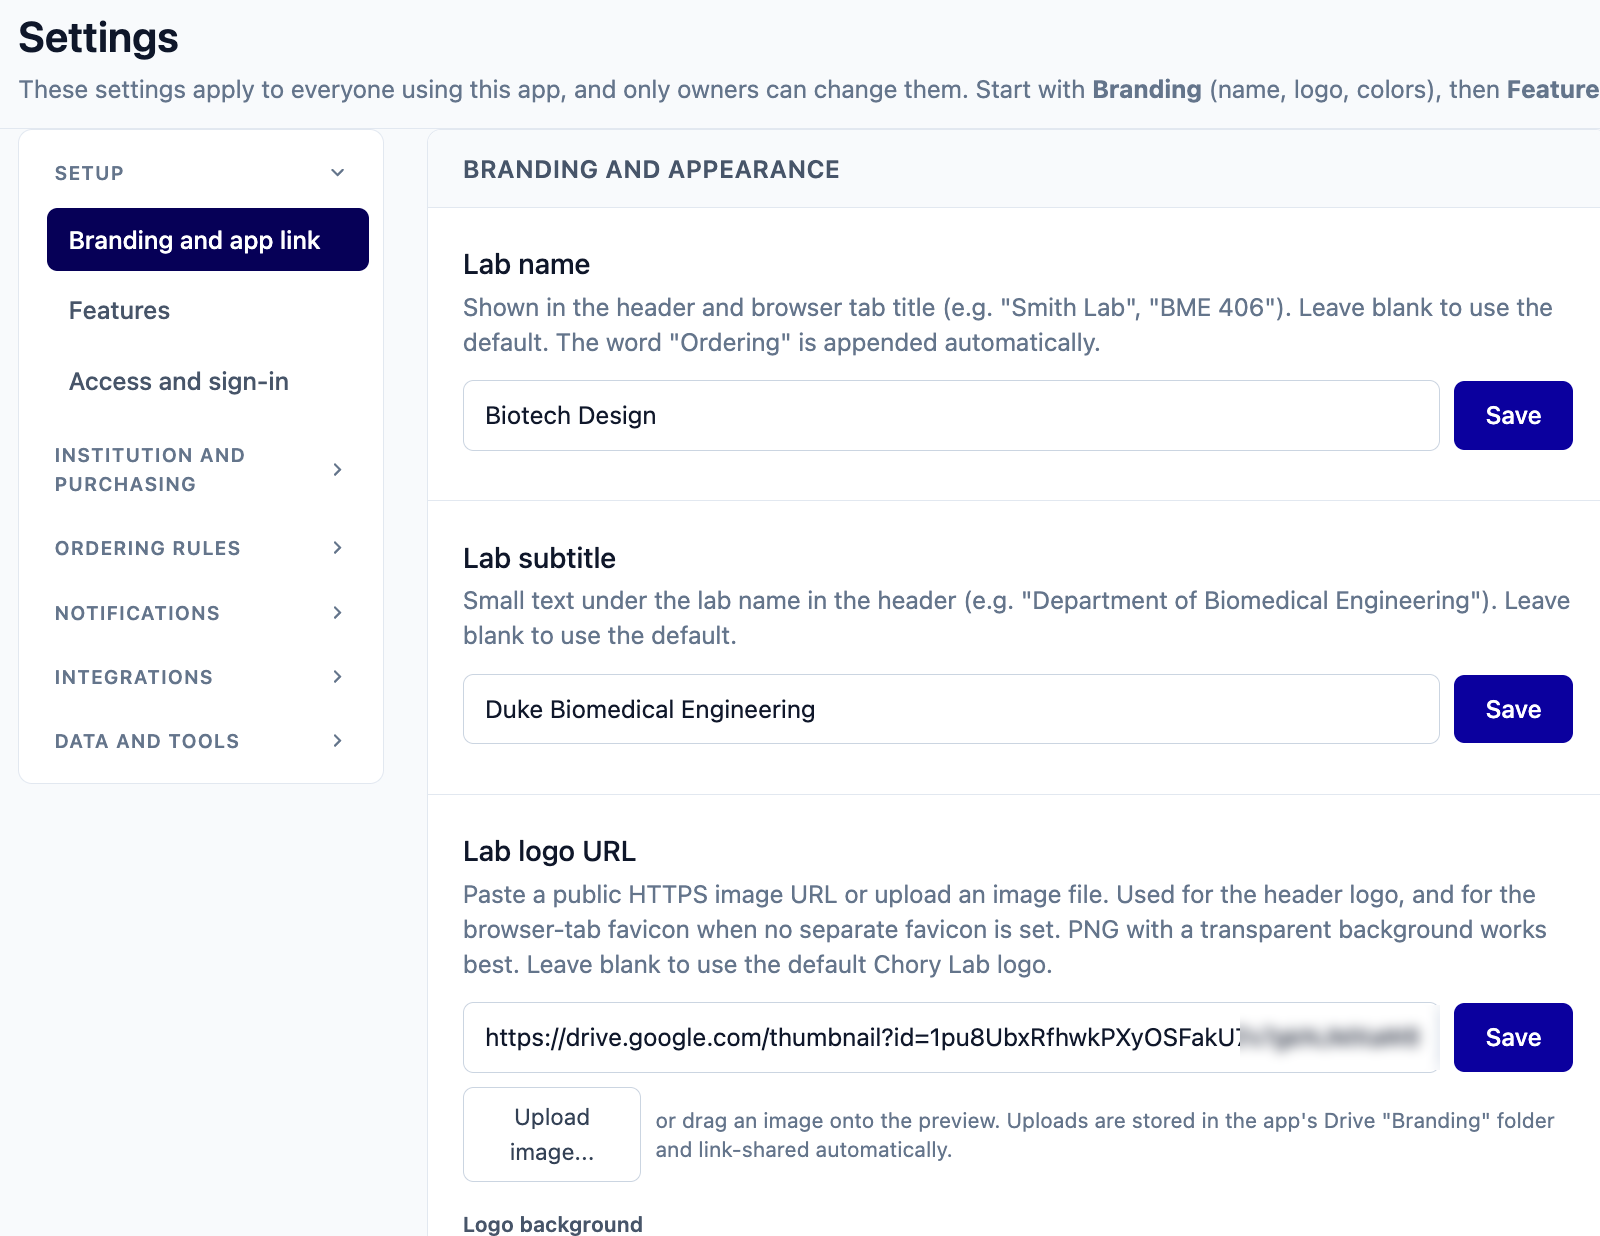
Branding and app link
- Spreadsheet and Drive folders: Links to the app's spreadsheet, its Drive folder and each folder it uses.
- Name and subtitle: Shown in the header and the browser tab.
- Logos: Your lab logo, a separate browser tab icon, and an institution logo used as the profile picture for anyone without a photo.
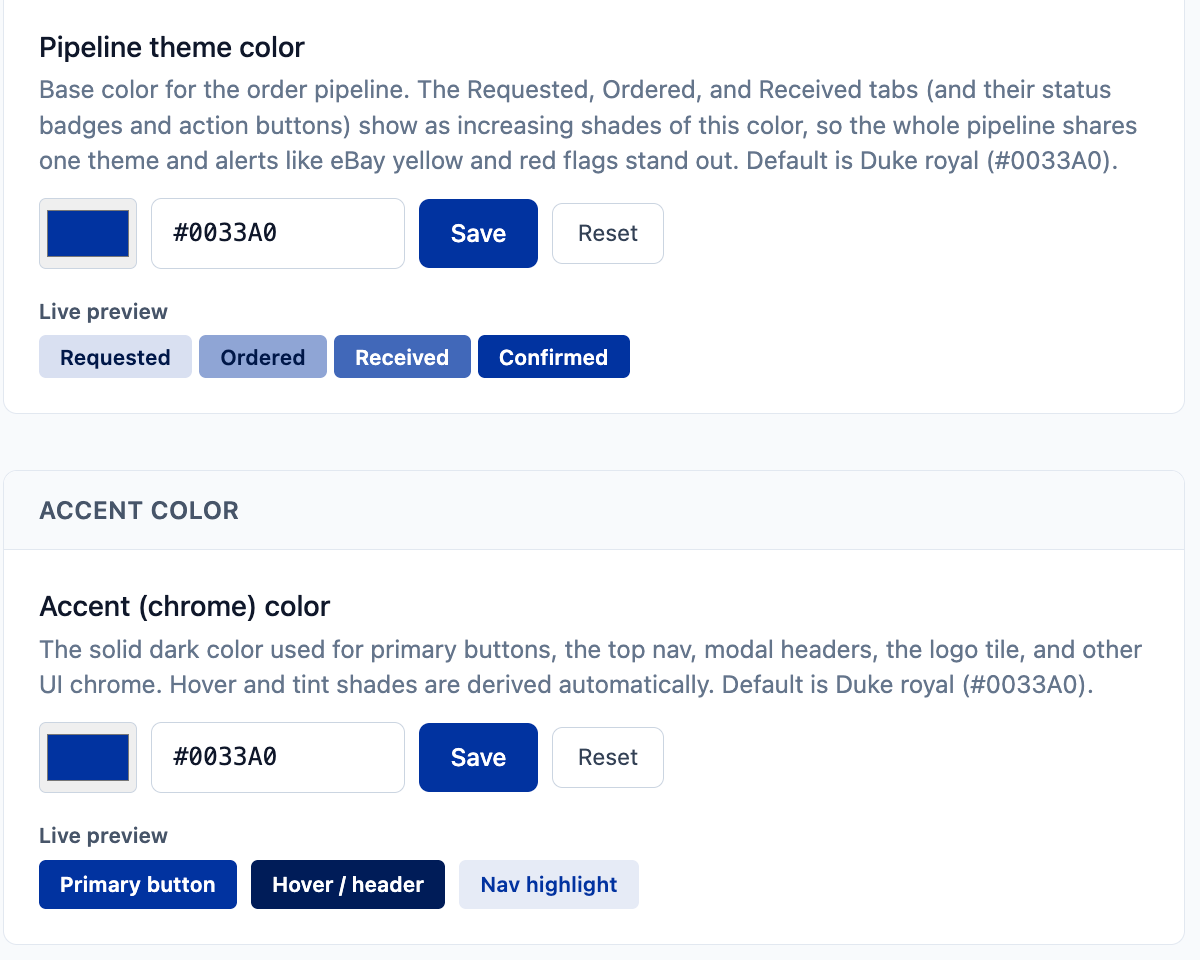
- Colors: A theme color for the order stages and an accent color for buttons and the top bar, both with a live preview.
- App link: A short link, such as a redirect from your lab website, used in every email and Slack message instead of the long web app address.
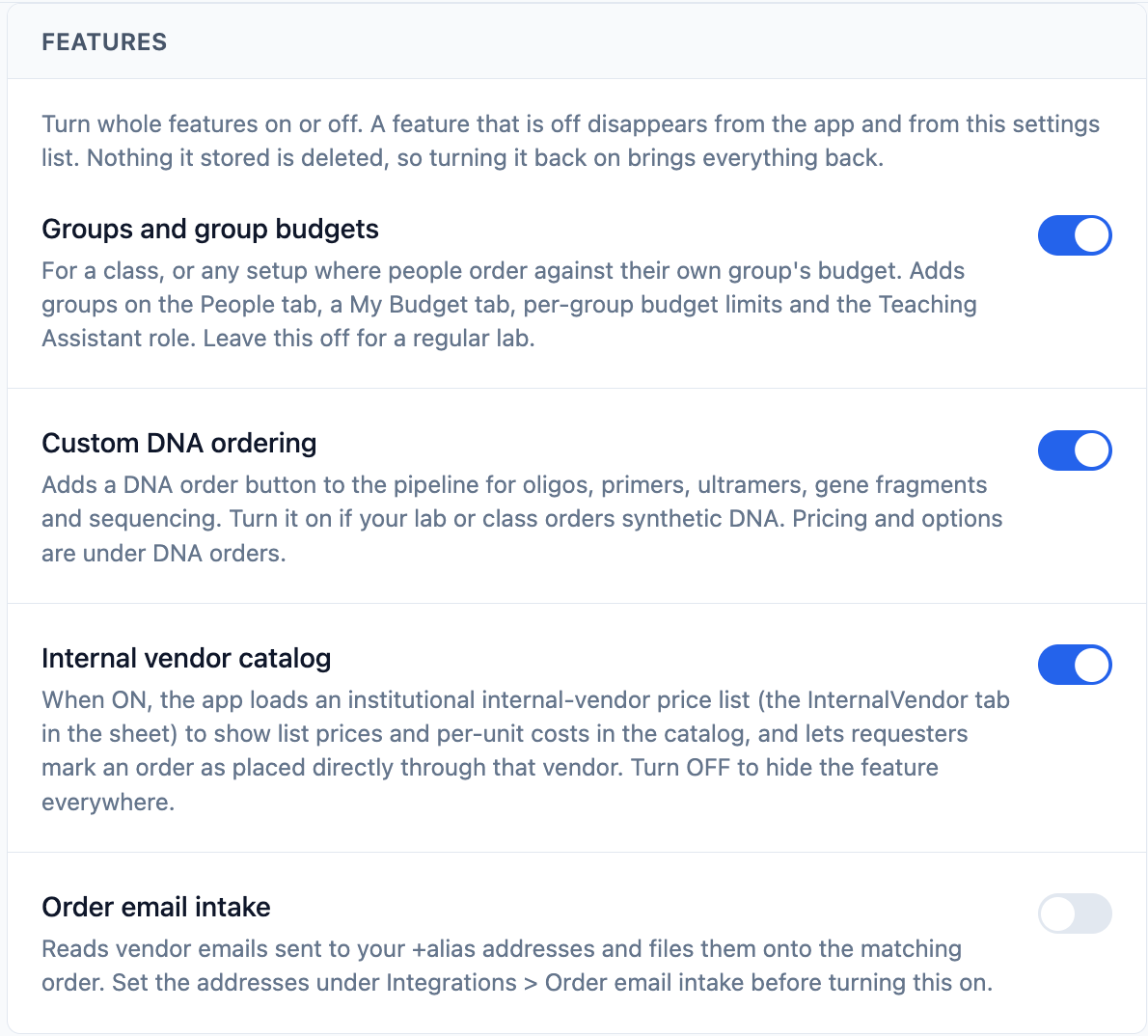
Features
| Groups and group budgets | For a class or any setup where people order against their own group's budget. Adds groups, My Budget, budget limits and the TA role. Leave it off for a regular lab. |
|---|---|
| Custom DNA ordering | Adds the DNA order button for oligos, gene fragments and sequencing. |
| Internal vendor catalog | Adds your institution's internal vendor or stockroom price list to the catalog and the request form. |
| Order email intake | Files vendor emails onto the matching orders. Set it up under Order email intake first. |
Access and sign-in
- Owner emails: Extra accounts with owner access. Anyone given the Owner role on the People page is an owner too, so you cannot lock yourself out.
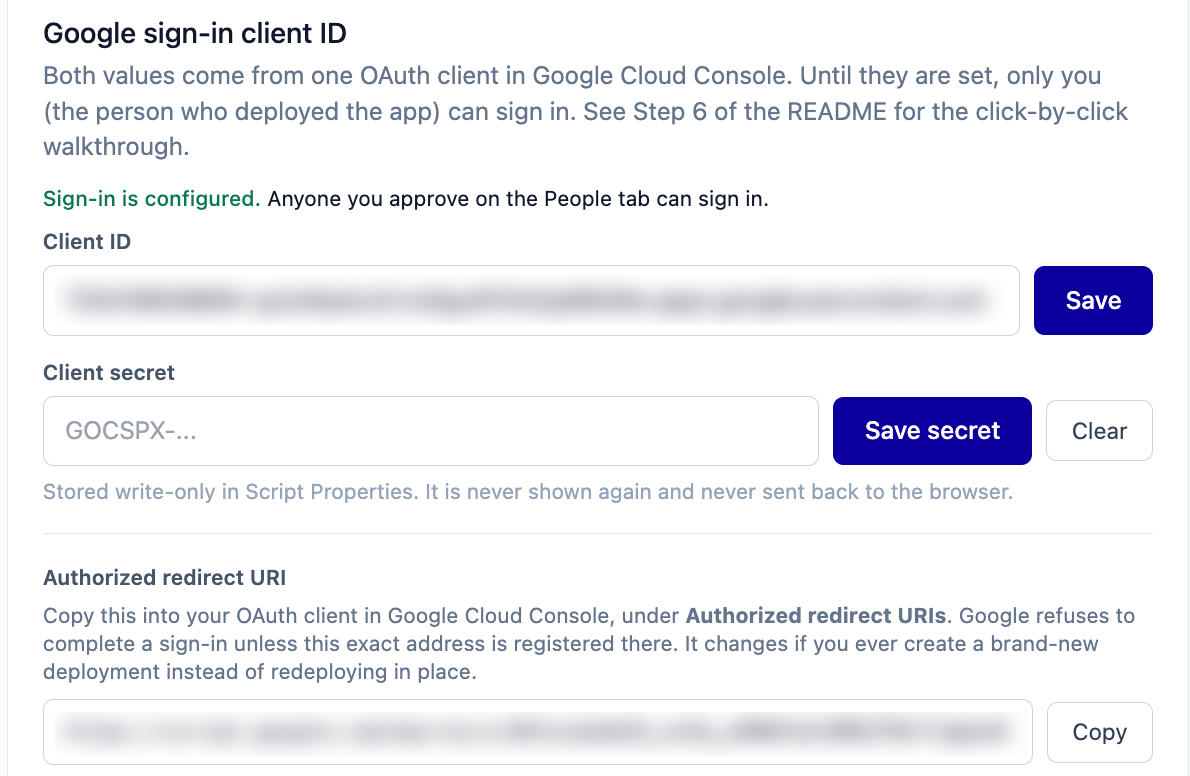
- Google sign-in: The client ID, client secret and redirect address from section 7 of the setup guide.
- Access codes: A requester code and an admin code that let people in without waiting for approval. Clear a code to turn that path off.
- Login Info password: Optionally require a separate password to open Login Info.
- Pictures and files: Shows whether setup has finished copying the starting pictures and safety sheets into your Drive, with a button to copy the rest now.
22. Institution and purchasing
- Internal ordering system name: What your institution calls its purchasing system, used in labels, emails and Slack.
- PI and institution name: Used in labels and to fill in forms.
- Purchase methods: The ways your lab buys things, such as punch-out, catalog, vendor ID and P-card. The Requested tab is grouped by these.
- Starter catalog: Imports a ready-made catalog from another spreadsheet, either replacing or adding to what is there.
- Shipping locations: The addresses your lab ships to, with one marked as the default.
- P-card purchases: Where P-card receipts are emailed, the address purchasers should give vendors, and vendors to skip.
- Internal vendor: Its name and a link to its ordering site.
- Starter pack: For approved Duke labs only, the button that loads the Duke forms, codes and internal price list. See section 6 of the setup guide.
manual-settings-institution.pngInternal codes
- Name your codes: Use the names your purchasing system uses, such as GL account and material group. Leave the second one blank if you only have one.
- Add your codes: Download the list as a CSV, fill it in or paste an export from your purchasing system, and upload it. You can also edit the InternalCodes tab in the spreadsheet.
- Lab-wide default: The codes used when a vendor has none of its own.
manual-internal-codes.pngStanding POs
- Instructions link: Where to find your institution's steps for a standing PO, shown to whoever places one.
- Amount limits: The amount above which a term sheet must be attached, and a hard ceiling above which a standing PO cannot be requested at all.
23. Ordering rules
Approvals
- Approval threshold: Orders with a total over this amount need an admin-approver. The default is $500.
- Require justifications: Ask requesters to explain the purchase, on P-card orders, orders over the threshold, both, or every order.
- Exempt items you order all the time: Lets a repeat purchase just over the threshold skip approval if your lab has bought it enough times, up to a ceiling you choose.
- Exempt bulk orders of cheaper items: Skips approval when the total is over the threshold only because of the quantity, for example three of a $170 item.
manual-settings-approvals.pngGroups and budgets
- What to call a group: For example Group, Team or Project.
- Budget enforcement: Block an order that would go over budget, warn but let it through, or set no limit. Admins and TAs are never blocked.
- Restrict order visibility: Students only see their own group's orders, while everyone can still browse the full catalog.
- Group Slack channels: Also post each group's requests to that group's own channel.
The groups themselves and their budgets are set on the People page.
manual-settings-groups.pngDNA orders
Set each vendor's price per base or per sample, with an optional minimum and setup fee, and the scale and purification options shown on the DNA order form.
Forms and templates
Upload the blank purchasing forms your institution asks for, such as a sole source justification. Requesters can then download the blank form or have it filled in from the order, with a live preview before it is attached.
- Make the PDF fillable: Copy the instructions on the page and give them to Claude with your blank form. Upload the corrected fillable PDF on the template card.
- Generate the filler: Click List fields on the card, copy the prompt, and give it to Claude with the same PDF. Paste its reply into the card.
- Test and save: Click Test to fill the form with sample data and check it, then click Save script.
You can also make a form required for certain categories or amounts.
manual-settings-templates.png24. Notifications
Email and Slack holds every message the app sends.
- Feedback email: Where the in-app feedback form is delivered.
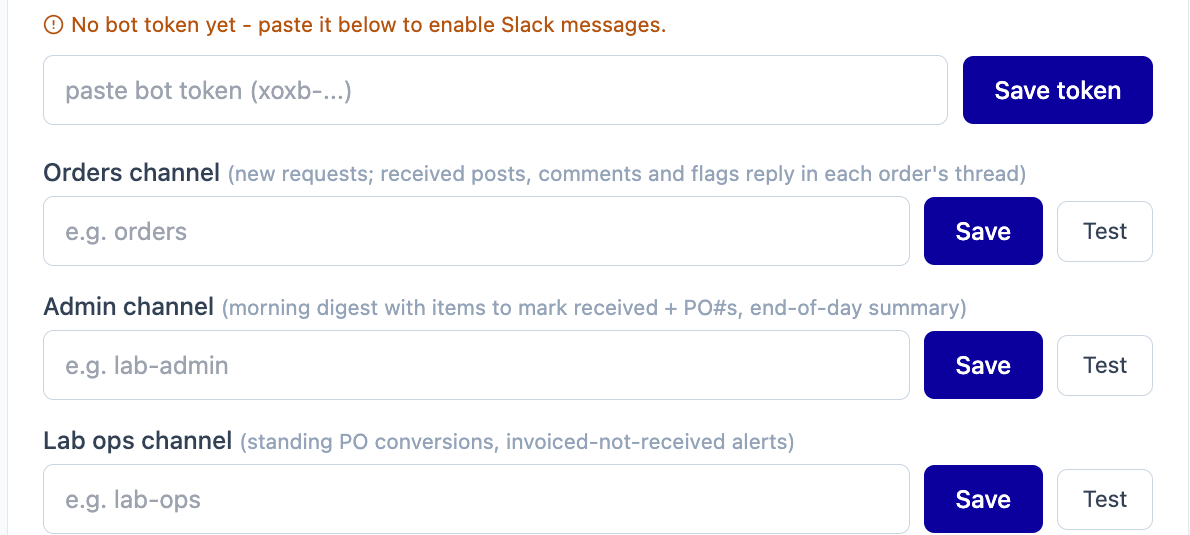
- Slack: The bot token, the orders, admin and lab operations channels, the order progress reactions, and a private test channel. Section 9 of the setup guide walks through it.
- Daily digests: An evening email to admins listing what still needs ordering or receiving, a morning Slack message to the admin channel, and an end-of-day summary, each at a time you choose, on weekdays only if you like.
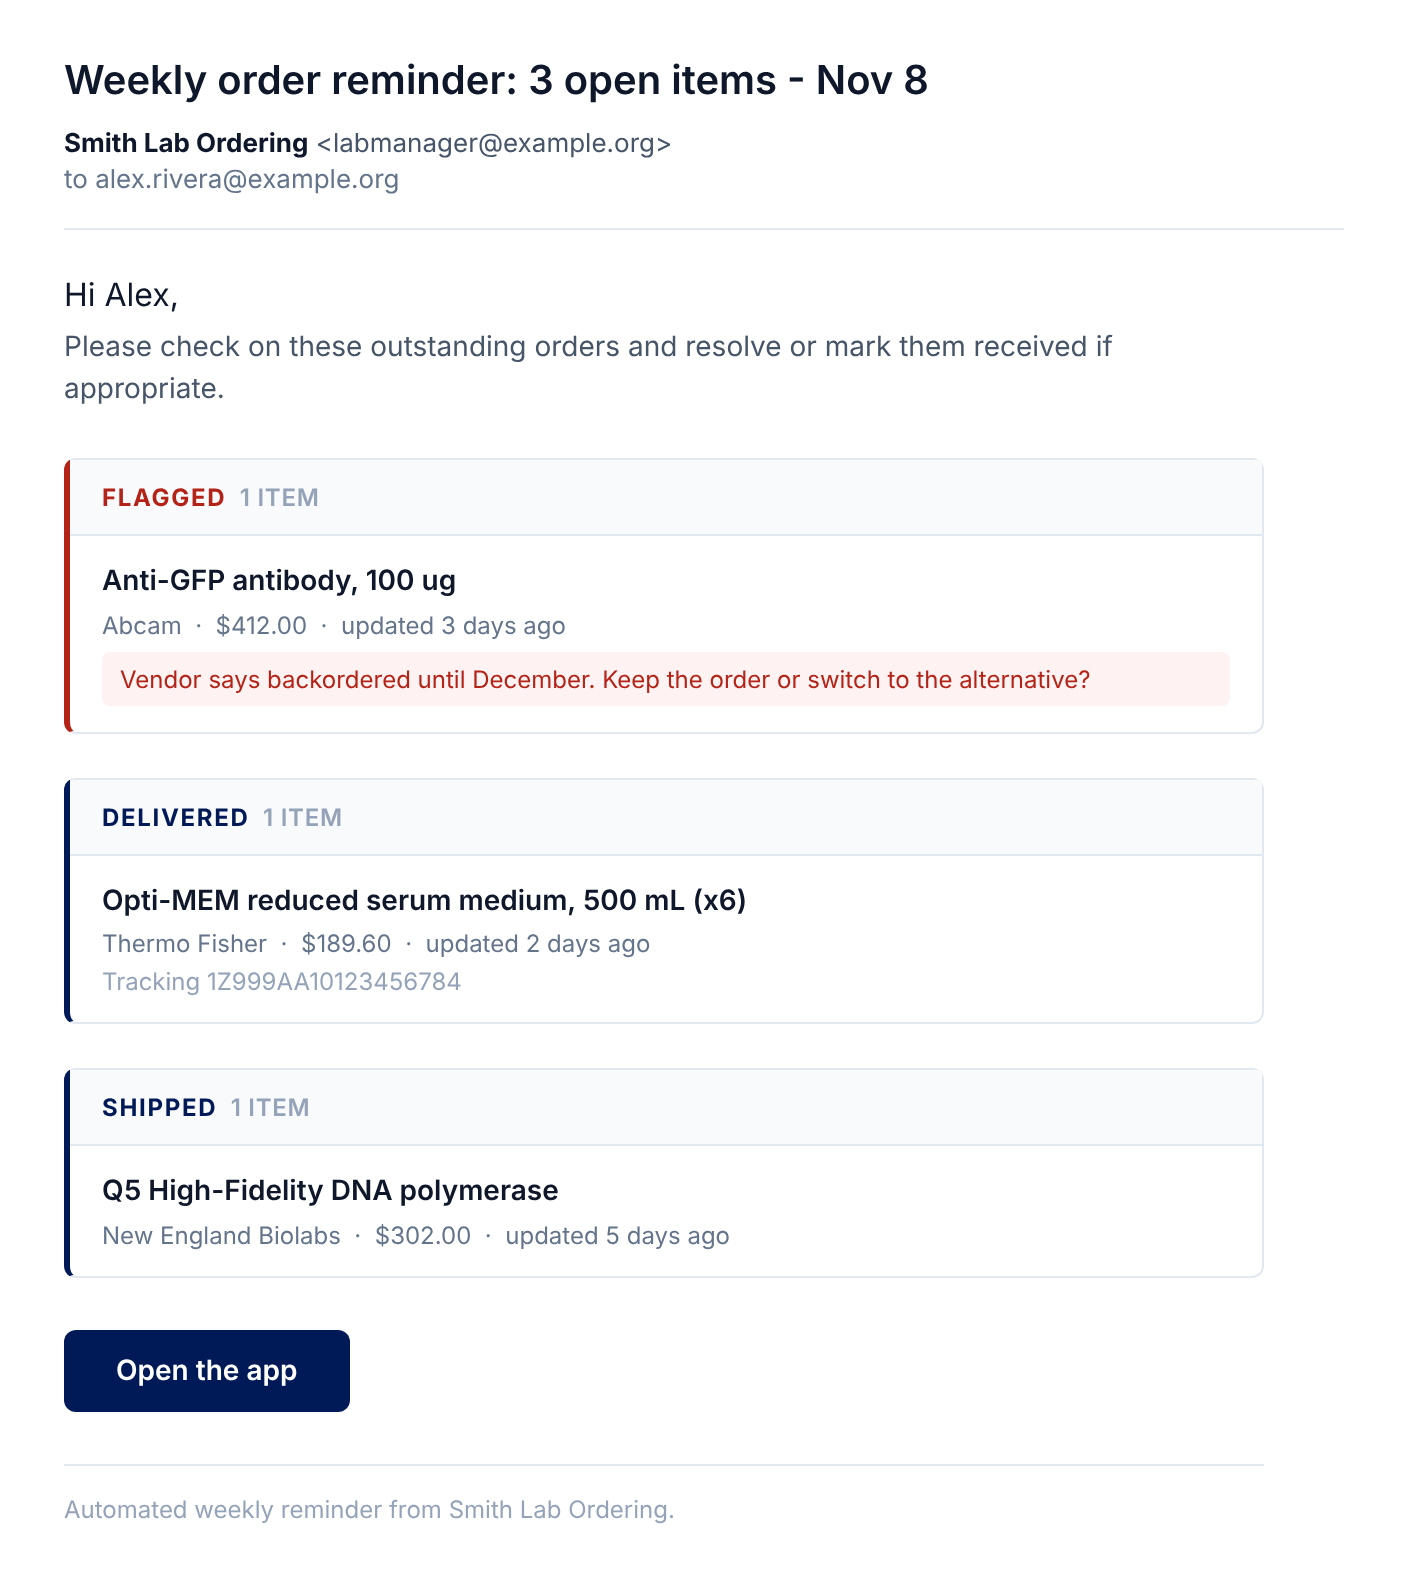
- Weekly reminder: A short personal email to each person about only their own orders that need something from them. Click Send me a sample to see one.
25. Integrations
API keys and AI models
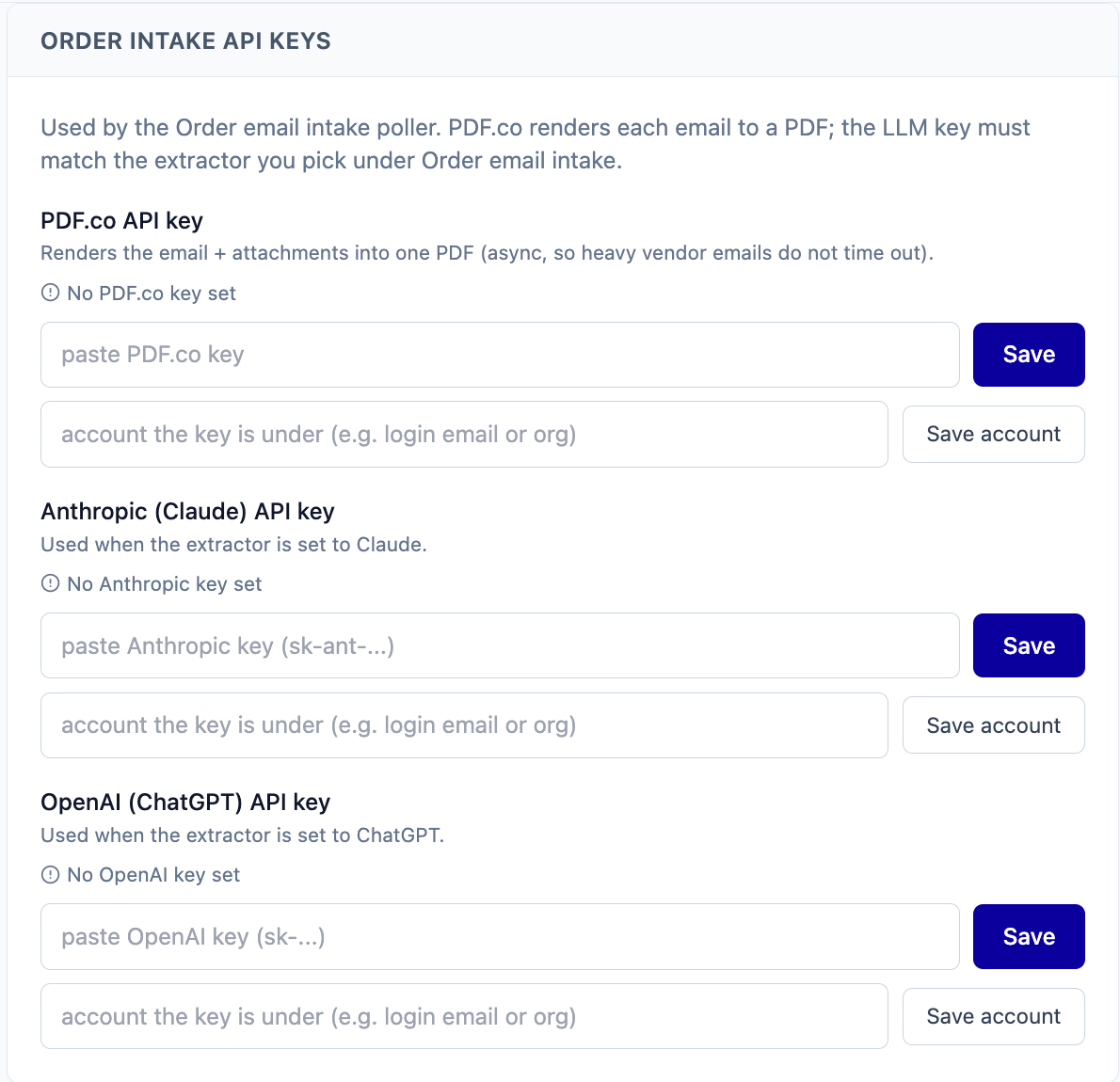
Paste an OpenAI (ChatGPT) or Anthropic (Claude) key, and choose the provider and model. The app uses it to read order numbers from vendor emails and to read product pages when someone adds an item from a link. Section 10 of the setup guide has the steps.
Order email intake
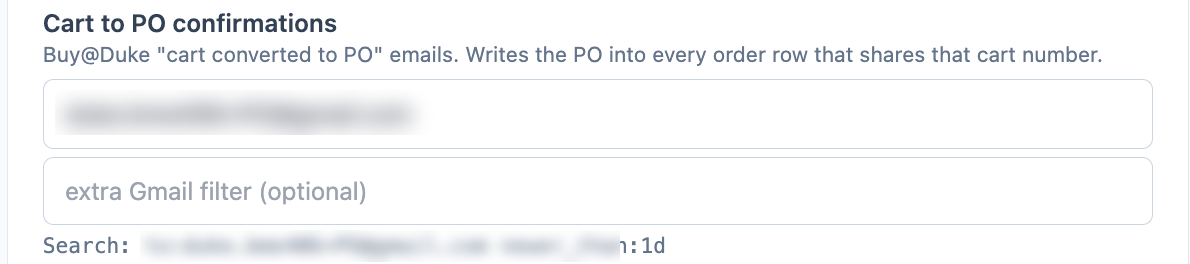
The app checks the inbox every 5 minutes for vendor emails sent to your +alias addresses, saves each one with its attachments as a single PDF, and files it on the matching order. Each alias handles one kind of email:
| Cart to PO | Writes the PO number onto every order in that cart. |
|---|---|
| Standing PO emails | Adds the PO number and dates to the standing PO. |
| Discount codes | Reads a forwarded promo email and saves the code on the vendor. |
| Order, shipping and delivery confirmations | Files the email on the order and lights up its pill. |
| Flags and cart issues | Flags the order and emails you. |
| Invoice received | Marks the order invoiced and reminds the lab if it is still not received after a few days. |
Set your PO number format and who gets flag emails at the bottom of the page. Section 11 of the setup guide shows how to set up the Gmail filters.
26. Data and tools
- Analytics: Leave the owner's own orders out of analytics, or drop large categories from the top items chart.
- Storage: Creates or checks every Drive folder the app uses.
- Linked spreadsheets: Connects a spreadsheet your lab keeps by hand, such as a plasmid or oligo list. The app reads it and shows its items beside your orders, and never writes to it.
- Inactive vendors: Stops new orders from a vendor you no longer use. Past orders are kept.
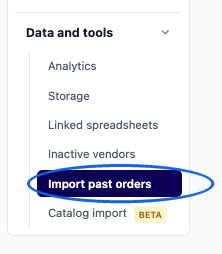
- Import past orders: Brings in your order history from a template or another program's export. See section 4 of the setup guide.
- Catalog import: Adds catalog items from another program's inventory export or from a vendor's PDF catalog with the help of Claude or ChatGPT.
Last updated 7 November 2026. Copyright © 2026 The Chory Lab, Duke University. Free to use and change for your own group (terms).